Get This Free Cheat Sheet Guaranteed To Help Your Next Mix

Thursday, September 27, 2012

Improve Your Band In 3 Easy Steps

Band Playing image from Bobby Owsinski's Big Picture music production blog
Regardless of whether a band is just starting off in the garage or has been playing gigs for years, there are a 3 things that can help the band improve in almost no time. Here's an excerpt from my band improvement book, How To Make Your Band Sound Great that can really makes a difference in how a band sounds.
-------------------

"When you’re making records, you get to listen to everything under a microscope, and after a while you begin to understand that there are a few universal truths about making your band sound tight and professional. Here’s a brief summary of perhaps the 3 most important steps to improving your band’s performance and taking it to the next level. I promise you that if you spend even a little time on each of these items, you’ll see positive results immediately.

Dynamics - Playing with dynamics is the greatest key to making your band sound great. It’s an improvement that both you (the band) and your audience will notice immediately, and will automatically separate you from about 90% of other bands on the planet.

So what are dynamics? Simply, it means playing quietly or with less intensity in certain places in a song, and louder or with more intensity in other places. Most bands are oblivious to dynamics and play at one volume throughout the entire song, song after song, set after set. This gets boring and tedious for the audience very quickly.

There are a few byproducts from playing dynamically too. The vocals can be heard better because there’s more space and fewer loud instruments to fight against (easier on the singer as well). Songs become more fun to play because there’s true interaction with the other players to make it work, and as a result, the band automatically gets tighter. And the audience perceives dynamics in a way that you wouldn’t expect - suddenly they’ll start telling you how tight you sound.

Attack and Releases ( or articulations) are one of the most overlooked, yet most important elements in playing together. Attacks and releases usually refer to a phrase that you’re either playing or singing. The attack part is usually easy - everyone starts to play or sing at exactly the same time in the same way. The releases are what’s overlooked. A release is how you end a phrase and it’s as important as how you start it. Once again, everyone has to end it at exactly the same time in exactly the same way. Getting your attacks and releases are one of the essential parts of making a good record (you hardly ever hear one off anymore) and they’re essential to making you sound tight as well. Listen to a song that everyone knows, Hotel California, for a great example of both attacks and releases (and phrasing) of both the guitars and vocals.

Turnarounds - Another often overlooked portion of a song that needs to be tight is the turnaround between sections, like the one or two bars between the verse and chorus, chorus and verse, verse and outro, chorus and bridge, etc. This part requires a lot of focus because it’s usually played a little differently from the rest of the section of the song. For the drummer, it’s usually a tom or snare roll into the next section, but unless it’s a build, most of the other players usually just randomly play something over the roll. If you’re playing a song that you’ve written, chances are that you’ve not thought about the turnaround too much, so now is the time. Make sure that every player has an exact part to play and that all parts work together and sound tight (a good idea for the rest of the song as well)."

For more excerpts from this and other books, check out my website at bobbyowsinski.com.

----------------------------------

You should follow me on Twitter for daily news and updates on production and the music business.

Don't forget to check out my Music 3.0 blog for tips and tricks on navigating social media and the new music business.

Wednesday, September 26, 2012

What To Change When Things Don't Sound Right

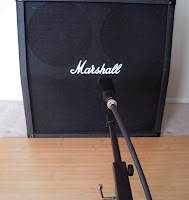
Miking A Marshall Cabinet image from Bobby Owsinski's Big Picture blog
Recording is an interesting business in that each situation is unique. When it comes to music, the song, the arrangement, the players, the performances, the signal chain, and the acoustic environment all vary in one way or another each and every session.

Because of this uniqueness, there are times when you're recording when you find that a part doesn't fit well in a track, or fits too well where it can't be distinguished. Here's a list of things to try in order of importance the next time you run in to either situation.
  • Change the source (the instrument you are miking) 
  • Change the mic placement 
  • Change the placement in the room 
  • Change the mic 
  • Change the mic preamplifier 
  • Change the mount of compression and/or limiting (from none to a lot) 
  • Change the room (the actual room you are recording in) 
  • Change the musician 
  • Come back and try it another day
Take notice that nowhere one there is there mention of equalization. Unless you have a lot of experience, it's best to follow the above points before you ever reach for an EQ knob. You'll be surprised how much better things can sound.

----------------------------------

You should follow me on Twitter for daily news and updates on production and the music business.

Don't forget to check out my Music 3.0 blog for tips and tricks on navigating social media and the new music business.

Tuesday, September 25, 2012

Four Tops "Bernadette" Isolated Tracks

I may have posted this before, but it's so cool that it's worth posting again. Here's a great video that shows off the virtuosity of Motown bassist James Jamerson on The Four Tops 60's hit "Bernadette." For most of the song you hear just Jamerson's bass, then the other parts of the song are gradually brought in, then muted.

Jamerson was truly one of a kind in that he didn't actually play a part as much as he played a groove. He's incredibly solid time-wise even within a flurry of pickup notes, and has style that's uniquely his. In fact, what's so cool is that he's given free reign within the arrangement to play what he pretty much as he wishes while the guitars and piano hold down the rhythm.

Also keep in mind that everything you hear was done on 8 track!


----------------------------------

You should follow me on Twitter for daily news and updates on production and the music business.

Don't forget to check out my Music 3.0 blog for tips and tricks on navigating social media and the new music business.

Monday, September 24, 2012

Timing The Reverb Decay To The Track

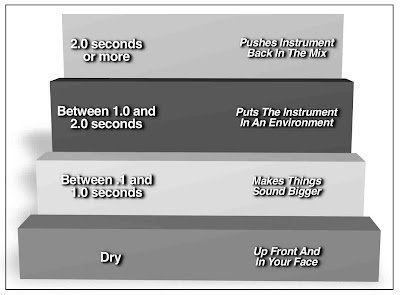
Reverb Front To Back image from Bobby Owsinski's Big Picture music production blog
My new book, The Audio Mixing Bootcamp, has just been released and I thought it would be a good time for an excerpt. The Mixing Bootcamp differs from The Mixing Engineer's Handbook in that it contains exercises that take you through the various aspects of mixes. By the way, there's also a video version of the book available on Lynda.com.

One exercise might take you in a direction that intentionally sounds bad in order for you to understand why a particular action isn't done much, while others will give you an idea of how why some other mixing actions are frequently used.

Here's an excerpt from the Adding Reverb chapter of the book along with a typical exercise.
------------------------------

Like with other aspects to mixing, the use of reverb is frequently either overlooked or misunderstood. Reverb is added to a track to create width and depth, but also to dress up an otherwise boring sound. The real secret is how much to use and how to adjust its various parameters.

Before we get into adding and adjusting the reverb in your mix, let’s look at some of the reasons to add reverb first

When you get right down to it, there are four reasons to add reverb.

1. To make the recorded track sound like it’s in a specific acoustic environment. Many times a track is recorded in an acoustic space that doesn’t fit the song or the final vision of the mixer. You may record in a small dead room but want it to sound like it was in a large studio, a small reflective drum room, or a live and reflective church. Reverb will take you to each of those environments and many more.

2. To add some personality and excitement to a recorded sound. Picture reverb as makeup on a model. She may look rather plain or even only mildly attractive until the makeup makes her gorgeous by covering her blemishes, highlighting her eyes, and accentuating her lips and cheekbones. Reverb does the same thing with some tracks. It can make the blemishes less noticeable, change the texture of the sound itself, and highlight it in a new way.

3. To make a track sound bigger or wider than it really is. Anything that’s recorded in  stereo automatically sounds bigger and wider than something recorded in mono, because the natural ambience of the recording environment is captured. In order to keep the track count and data storage requirements down, most instrument or vocal recordings are done in mono. As a result, the space has to be added artificially by reverb. Usually, reverb that has a short decay time (less than one second) will make a track sound bigger.

4. To move a track further back in the mix. While panning takes you from left to right in the stereo spectrum, reverb will take you from front to rear (see Figure 8.1). An easy way to understand how this works is to picture a band on stage. If you want the singer to sound like he’s in front of the drum kit, you would add some reverb to the kit. If you wanted the horn section to sound like it was placed behind the kit, you’d had more reverb. If you wanted the singer to sound like he’s in between the drums and the horns, you’d leave the drums dry and add a touch of reverb to the vocal, but less than the horns.

If we were going to get more sophisticated with this kind of layering, we’d use different reverbs for each of the instruments and tailor the parameters to best fit the sound we’re going after.

Timing A Reverb To The Track
One of the secrets of hit making engineers is that they time the reverb to the track. That means timing both the pre-delay and the decay so it breathes with the pulse of the track. Here’s how it’s done.

The decay of a reverb is timed to the track by triggering it off of a snare hit and adjusting the decay parameter so that the decay just dies by the next snare hit. The idea is to make the decay “breathe” with the track.

Exercise Pod - Timing Reverb Decay
Before you begin any of the exercises in this chapter, be sure to have two reverbs with the sends and returns already set up. Set one reverb to “Room” (we’ll call it Reverb #1) and the other to “Hall” (Reverb #2). Refer to your DAW or console manual on how to do this.

E8.1: Solo the snare drum and the reverb returns (or put them into Solo Safe - refer to you DAW or console manual on how to do this). Be sure that the Dry/Wet control is set to 100% wet, and the return levels are set at about -10.

A) Raise the level of the send to the Room reverb until the reverb can be clearly heard. Does the snare sound distant? Does it sound bigger than before?

B) Adjust the Decay parameter until the reverb dies out before the next snare hit of the song. Does the snare sound clearer? 

C) Mute the send to the Room reverb and raise the level to the Hall reverb. Does the snare sound distant? Does it sound bigger than before? Does it sound bigger than the Room reverb?

D) Adjust the Decay parameter until the reverb dies out before the next snare hit of the song. Does the snare sound clearer? Does it sound bigger?

E) Adjust the Decay parameter until the reverb dies out before the 2nd next snare hit after the initial hit. Does the snare sound clearer? Does it sound bigger?


You can get more info on The Audio Mixing Bootcamp here, and read additional excerpts from this and other books at bobbyowsinski.com.

----------------------------------

You should follow me on Twitter for daily news and updates on production and the music business.

Don't forget to check out my Music 3.0 blog for tips and tricks on navigating social media and the new music business.
Sunday, September 23, 2012

New Music Gear Monday: The Apogee Quartet

I've decided to rename "New Musical Instrument Monday" to "New Music Gear Monday" since so much of what's cool and new has to do with audio as much as musical instruments.

This week we'll look at the new Apogee Quartet, a 4 input, 8 output audio interface for your DAW. Apogee's always been known for making great sounding gear, so it's exciting when they introduce something new. While I'm sure it does indeed sound terrific (I haven't tried it out yet), what I really like about it is that it also acts as a "control center," with an extra large knob that can be used for controlling your monitor volume. Anyone who owns a home studio knows that not having this ability is one of the more irritating things about working on a DAW.

The Quartet uses USB to interface with the computer, works at a resolution of 192kHz/24 bit, and has 4 mic preamps (which should be plenty for most home studio applications if you're not tracking a band). It looks like the list price is around $1300 or so. Plus, the design is very Apple-like, so it should fit in very well on your desktop, if the visual look of your workspace is an issue. Check out the video.


----------------------------------

You should follow me on Twitter for daily news and updates on production and the music business.

Don't forget to check out my Music 3.0 blog for tips and tricks on navigating social media and the new music business.
LinkWithin

Related Posts Plugin for WordPress, Blogger...