Get This Free Cheat Sheet Guaranteed To Help Your Next Mix

Showing posts with label Audio Recording Basic Training. Show all posts

Tuesday, June 17, 2014

5 Steps To Checking Your Drum Phase When Mixing

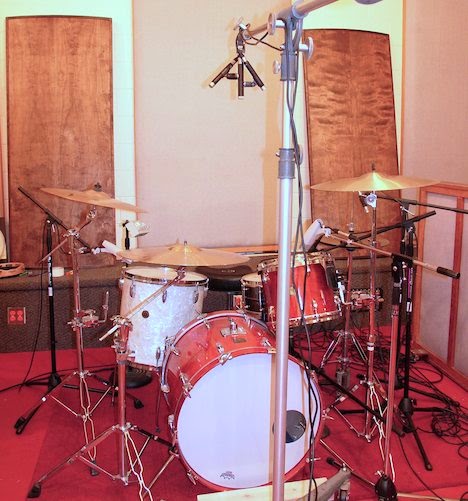
Drum kit with ORTF overheads imageOne of the most important yet overlooked parts of a drum mix is checking the phase of the drums. This is because not only will an out-of-phase channel suck the low end out of the mix, but it will get more difficult to fix as the mix progresses.

I covered how to check the polarity of the drum mics a few weeks ago, but here's an excerpt from my Audio Recording Basic Training book (also covered in the Audio Mixing Bootcamp book) that covers a way to check the phase when you're setting up for a mix as well.

"A drum mic can be out of phase due to a mis-wired cable or poor mic placement. Either way, it’s best to fix it now before the mix goes any further.

1) With all the drums in the mix, go to the kick drum channel and change the selection of the polarity or phase control. Is there more low end or less? Chose the selection with the most bottom end.

2) Go to the snare drum channel and change the selection of the polarity or phase control. Is there more low end or less? Chose the selection with the most bottom end.

3) Go to each tom mic channel and change the selection of the polarity or phase control. Is there more low end or less? Chose the selection with the most bottom end.

4) Go to each cymbal mic or overhead mic and change the selection of the polarity or phase control. Is there more low end or less? Chose the selection with the most bottom end.

5) Go to each room mic channels and change the selection of the polarity or phase control. Is there more low end or less? Chose the selection with the most bottom end."

You'd be surprised how many times that flipping the phase on one or two of the drum mic channels results in a better, fuller sounding kit, even on one that's well-recorded.

To read additional excerpts from the Audio Recording Basic Training book or any of my other books, go to the excerpts section of bobbyowsinski.com.
----------------------------------

Tuesday, June 10, 2014

A Foolproof Method For Miking A Guitar Amp

Sometimes getting an electric guitar center is dead easy and other times getting the sound to fit into the track seems like the most difficult thing in the world. Here's an excerpt from my Audio Recording Boot Camp book that provides an almost foolproof method for miking a guitar amplifier.

"Electric guitar recording has evolved through the years, from miking the amplifier from a distance, to close miking, to using multiple mics, to recording direct and finally using an amplifier emulator. No one technique is better than another. In fact, multiple techniques are frequently used on the same recording.

Electric guitars don’t have need anything fancy to capture them. The frequency response doesn’t go that high or that low, and the more distorted it is, the fewer transients the signal has, making it somewhat easier to capture than other instruments. Has a result, dynamic mics are frequently used with good results. That said, sometimes it’s surprising just how good an amp can sound when a large diaphragm condenser or ribbon mic is used, so don’t be afraid to experiment.

Miking The Speaker Cabinet
While many engineers like to use our friend the Shure SM57 in this role, just about any mic can work if you know the sound that you’re looking for and the best way to approach it.

Classic Setup One - Close Miking The Cabinet
Standard speaking cabinet miking technique image
Figure 1: The standard cabinet miking technique
A) If there are more than one speaker in the cabinet, listen to them all to find the one that sounds the best. Is one scratchy sounded or distorted? Is one muffled with no high end? Does one have no low end? Find the one with the best balance of frequencies that’s not intentionally distorted.
B) Place the mic about one inch away from the best sounding speaker in the cabinet and about three quarters of the way between the edge of the speaker and the voice coil (away from the voice coil). Have the guitar player play the song you’re about to record and listen on the monitors. Does it sound like what you heard in the room? Is the sound full enough? Is it too edgy? Is it too bassy? 
C) Move the mic towards the voice coil (the center of the speaker - see Figure 1)). Is the sound still full? Did it brighter? Did it get bassy?
D) Move the mic towards the outside edge of the speaker. Is the sound still full? Did it brighter? Did it get bassy?

Classic Setup Two - Distance Miking Where The Speakers Converge
Distant guitar cabinet miking image
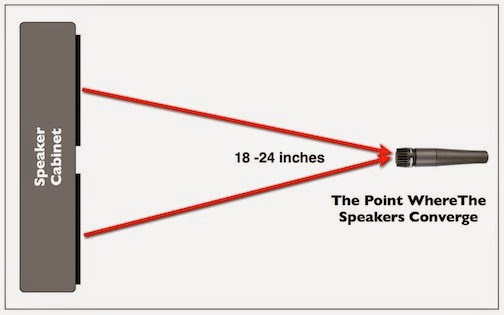
Figure 2: Distant miking
E) Move the mic about at least a foot away from the the speaker or speakers to capture some of the room sound. The ideal distance on a cabinet with two speakers is where the output of both speakers combine (see Figure 2). Does it sound bigger? Can you hear the sound of the room in the recording? Can you hear some frequencies cancel out between the two speakers?
F) Move the mic to the side to capture more of the sound of one of the speaker’s voice coils if more high end is required.

Classic Setup Three - Close and Distance Miking
Close and distant guitar cabinet miking image
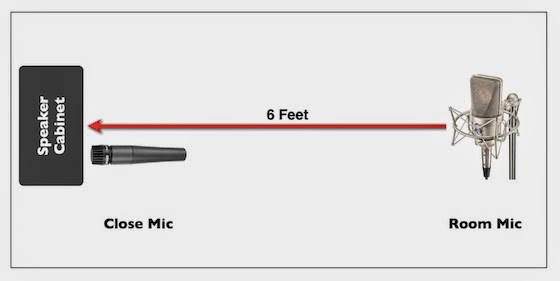
Figure 3: Close and distance miking
G) Move the mic back to the best sounding position close to the speaker and add an additional mic at the spot where the sound of the speakers converge 18 to 24 inches away. Is the sound still full? Did it get brighter? Did it get bassy? Did it get bigger sounding? Is it closer to what you heard in the room? Is there more of the room sound?
H) Increase the distance to 6 feet if possible (Figure 3). Is the sound still full? Did it brighter? Did it get bassy? Is there more of the room sound?
I) Place both mics at the point where they give the sound closest to what you heard in the room, or what best fits the track when the other instruments are playing."

By following this guideline, you should end up with a guitar sound that fits your track well without having to resort to any EQ or effects.

To read additional excerpts from the Audio Recording Basic Training book, go to the excerpts section of bobbyowsinski.com.
----------------------------------

Tuesday, June 18, 2013

Recording The Bass Amp

Miking The Bass Amp image
Using a Beta 52 and SM 57 on the bass cabinet
Today everyone is conditioned to go direct with the bass guitar that many times miking a bass amp is completely overlooked. That's too bad because it can bring something to the track that you just can't get any other way. Here's an excerpt from my Audio Recording Basic Training book that provides an exercise for bass amp miking.

"Back in the 60’s and 70’s, the way engineers recorded the electric bass was by miking the bass amp. As direct boxes became more and more available, the trend eventually swung the other way, with most bass recording done direct. Today it’s very common to record a bass using a combination of both an amp and direct, which provides the best of both worlds. While the bass will sound full and warm with a direct box, the amp can add just enough edge to help the bass punch through a mix.

When using a direct box, be aware that they’re not all created equal in that some will not give you the low fundamental of the bass that you expect when recording this way. Active DIs do a better job at this than passive, although some passive boxes (like the ones made by Radial) do an excellent job because of the large Jensen transformer used in the circuit.

Depending on the sound that fits the track best, mix the amp track with a DI track. The sound will change substantially depending upon the balance of the DI and miked amplifier. ALWAYS check the phase relationship between the amp and DI to make sure there’s no cancellation of the low end. Flip the polarity switch to the position that has the most bottom. Also remember that there’s no rule that says that you have to use both tracks, so don’t hesitate to use just a single track if it sounds best in the mix.

E7.4: Miking The Bass Amp
A) Listen closely to the amp as the bass player plays. If there are multiple speakers, find the one that sounds the best as in E7.1A. 
B) Place a large diaphragm dynamic mic like D-112, RE-20 or Beta 52 a little off-center and a couple of inches away from a cone of the best sounding speaker in the bass cabinet.   
C) Move the mic across the cone. Is there a spot where it sounds particularly good? Keep the mic at that spot. Is the sound balanced frequency response-wise? Can you hear any of the room reflections? 
D) Move the mic towards the end of the cone? Is there more low end? Is it more distinct sounding? 
E) Move the mic towards the center of the speaker? Is there more low end? Is it more distinct sounding? 
F) Move the mic about a feet away from the speaker. Is there more low end? Is it more distinct sounding? 
G) Move the mic about 2 feet away from the speaker. Is there more low end? Is it more distinct sounding? Can you hear more of the room? Does it work with the rest of the instruments? 
H) Raise the cabinet about a foot off the floor. Is there more low end? Is it more distinct sounding?  
I) I) Place the mic where it gives you the best balance of body and definition, and balance between the direct and ambient room sound."
You can read additional excerpts from this and other books at bobbyowsinski.com.
----------------------------------
You should follow me on Twitter for daily news and updates on production and the music business.

Don't forget to check out my Music 3.0 blog for tips and tricks on navigating social media and the new music business.

Tuesday, June 11, 2013

4 Vocal Mic Placement Tips

Vocal Mic Distance image
The vocals are always in the spotlight of a song, yet sometimes they receive far less attention during setup than other instruments like the drums. In this excerpt from Audio Recording Basic Training, you'll not only get a few great tips, but an exercise that will lead you through the different ways of vocal miking that will show you their pro's and con's.

"Just like with a great sounding instrument, many times with a good singer you'll get the "sound" automatically just by putting him/her in front of the right microphone. On the other hand, with a bad or inexperienced singer even a high priced microphone or signal processing won’t add the polish you’re looking for. That said, if you start with the correct technique, you’re half-way there.

There are a number of things to remember before you begin to place the mic:
  • The best mic in the house won’t necessarily get the best vocal sounds, so don’t be afraid to experiment with different mics.
  • Decoupling of the stand from the floor will help get rid of many unwanted low-frequency rumbles that occur from truck traffic, machinery being used down the street, footsteps, and things that are even lower in frequency than normal hearing. Just place the stand on a couple of mouse pads or a rug for an inexpensive solution.
  • One of the main things that you’re trying to do with mic placement is eliminate pops, lip smacks, and breath blasts.
  • An easy way to have a vocalist gauge the distance from the mic is by hand lengths. An open hand is approximately eight inches while a fist is about four inches. By saying, “Stay a hand away”, the vocalist can easily judge his distance and usually doesn’t forget (see the figure on the side).
Exercise Pod: Recording The Lead Vocal
E8.1: Recording Lead Vocal
A) Place the mic even with the vocalist’s lips about one hand away (see the figure on the left) and have him or her sing the verse of a song. Did you hear any pops or breath blasts?

B) Move the vocalist back to about two hands away and sing the same part of the song. Turn up the gain so it’s the same as before. Did you hear any pops or breath blasts now?

C) Move the vocalist back to one hand away and readjust the gain. Place the mic even with the vocalist’s nose and have the him sing the verse of a song. Did you hear any pops or breath blasts? Did the sound of the vocal change? Is it more or less defined?

D) Now place the mic even with the vocalist’s eyes and point it down towards the lips (see Figure 8.3). Have him sing the verse of a song. Did you hear any pops or breath blasts? Did the sound of the vocal change? Is it more or less defined?

E) Now place the mic even with the vocalist’s lips about one hand away again. Either change the pickup pattern to omnidirectional or change the mic to one with an omni pattern. Have him sing the verse of a song again. Did you hear any pops or breath blasts? Did the sound of the vocal change? Is it more or less defined?

F) Place the mic so there’s no breath blasts or pops."

You can read additional excerpts from this and other books at bobbyowsinski.com.
----------------------------------
You should follow me on Twitter for daily news and updates on production and the music business.

Don't forget to check out my Music 3.0 blog for tips and tricks on navigating social media and the new music business.

Wednesday, April 24, 2013

Checking The Drum Phase

As I've stated in many previous posts on recording, phase problems are one of the major sound destroyers, causing frequencies to cancel out in a way that they can never be recovered regardless of how much EQ you add later. That's why I've featured a section on checking and correcting phase in a number of books like The Audio Mixing Bootcamp, Recording Engineer's Handbook, Audio Recording Basic Training, and Drum Recording Handbook. Get this right, and you're way ahead of the game when it comes to making things sound good, especially the drums.

In this video from the Audio Recording Techniques course from Lynda.com, you'll see and hear one of the ways to correct phase problems on the drum kit either during recording or mixing. The examples are pretty apparent, and once you hear it once, you'll be aware of what to do and how to fix it forever.

You might like to see more of this or other Lynda courses, and you can click here for a free 7 day trial.


----------------------------------

You should follow me on Twitter for daily news and updates on production and the music business.

Don't forget to check out my Music 3.0 blog for tips and tricks on navigating social media and the new music business.

Monday, January 14, 2013

A Recording Session Checklist

Basic Tracks image from Bobby Owsinski's Big Picture production blog Here's a recording checklist derived from both The Recording Engineer's Handbook and Audio Recording Basic Training that, if followed, will pretty much keep any engineer, or musician trying to record himself or his band, out of trouble.

1. Does the instrument sound great acoustically? Make sure that you start with a great acoustic sound with the instrument well-tuned and minimum of sympathetic vibrations and extraneous noises.

2. Are the mics acoustically in phase? Observe the 3:1 rule and make sure that any underneath mics are at a 90° angle to the top mics.

3. Are the mics electronically in phase? Make sure that all the mic cables are wired the same by doing a phase check.

4. Are the mics at the correct distance from the instrument? If they’re too far away they’ll pick up too much of the room or other instruments. If they’re too close the sound will be unbalanced with either too much attack or ring, and not enough of the body of the instrument. Walk around the player, put your finger in your ear, and find the spot that sounds the best. Remember, most instruments need some space for the sound to develop. The ambience from the surrounding area is a big part of the sound for most instruments.

5. Does it sound the same in the control room as when you’re standing in front of the instrument? This is your reference point and what you should be trying to match. You can embellish the sound after you’ve achieved this.

6. Is there another problem besides the mic placement? A great sound is dependent upon the instrument, the player, the amp and the room. The player has to be able to achieve the tone you're trying to record with his hands first and foremost. The mic itself usually has less to do with the ultimate sound than the placement, room and the player and ultimately, the project itself.

You should always trust your ears and begin by listening to the musician in your studio, find a sweet spot and then begin your microphone placement there. If you don’t like the resultant sound, then move the mic or swap it with another. EQ is the last thing you should touch.

7. Is the problem in your signal chain? Don’t neglect your microphone preamp. The better your preamp, the less trouble you’ll have capturing the sound, but sometimes a certain mic/preamp combination will give you the sound you need. Experiment.

8. Is the problem the players signal chain? A guitarist’s signal chain can be a huge help or a big hindrance. You’ll get a warmer yet aggressive guitar sound by decreasing the amount of distortion from pedals, but turning up the amp’s volume instead to obtain the sustain/distortion from the amp and speaker. Also, smaller amps and speakers tend to sound bigger than large amps/speakers when recording.

REMEMBER: Mics cannot effectively be placed by sight, which is a mistake that is all too easy to make. The best mic position can't be predicted, it must be found.

Check out bobbyowsinski.com for more book excerpts, or take a look at the Audio Recording Techniques video course at Lynda.com.

----------------------------------

You should follow me on Twitter for daily news and updates on production and the music business.

Don't forget to check out my Music 3.0 blog for tips and tricks on navigating social media and the new music business.


Tuesday, November 13, 2012

Basic Guitar Amp Miking Techniques

Audio Recording Basic Training book image from Bobby Owsinski's Big Picture blog
As you might know, I have a couple of new books and video courses that have just been released. The Audio Mixing Bootcamp and Audio Recording Basic Training books published by Alfred Music Publishing are now available in book stores, music stores and online, and the video version of both books is also available from lynda.com (go here for a free 7 day trial).

The books are designed primarily for the musician who owns some recording gear and just can't seem to get the results they're hoping for. They consist of a series of exercises that shows you why a particular technique works or doesn't. Here's an example from Audio Recording Basic Training regarding the most fundamental technique used to record a guitar amplifier.
---------------------------------

"Electric guitar recording has evolved through the years, from miking the amplifier from a distance, to close miking, to using multiple mics, to recording direct and finally using an amplifier emulator. No one technique is better than another. In fact, multiple techniques are frequently used on the same recording.

Electric guitars don’t have need anything fancy to capture them. The frequency response doesn’t go that high or that low, and the more distorted it is, the fewer transients the signal has, making somewhat easier to capture than other instruments. Has a result, dynamic mics are frequently used with good results. That said, sometimes it’s surprising just how good an amp can sound when a large diaphragm condenser or ribbon mic is used, so don’t be afraid to experiment.

Miking The Amplifier
While many engineers like to use our friend the Shure SM57 in this role, just about any mic can work if you know the sound that you’re looking for and the best way to approach it.

Exercise Pod: Recording The Electric Guitar
E7.1: Miking The Amplifier
A) If there are more than one speaker in the cabinet, listen to them all to find the one that sounds the best. Is one scratchy sounded or distorted? Is one muffled with no high end? Does one have no low end? Find the one with the best balance of frequencies that’s not intentionally distorted.

B) Place the mic about one inch away from the best sounding speaker in the cabinet and about three quarters of the way between the edge of the speaker and the voice coil (away from the voice coil). Have the guitar player play the song you’re about to record and listen on the monitors. Does it sound like what you heard in the room? Is the sound full enough? Is it too edgy? Is it too bassy? 

C) Move the mic towards the voice coil (the center of the speaker - see Figure 7.1)). Is the sound still full? Did it brighter? Did it get bassy?

D) Move the mic towards the outside edge of the speaker. Is the sound still full? Did it brighter? Did it get bassy?

SM57 On Cabinet image from Bobby Owsinski's Big Picture blog
Figure 7.1: The Classic Setup - An SM57 On The Cabinet
E) Move the mic about at least a foot away from the the speaker or speakers to capture some of the room sound. The ideal distance on a cabinet with two speakers is where the output of both speakers combine (see Figure 7.2). Does it sound bigger? Can you hear the sound of the room in the recording? Can you hear some frequencies cancel out between the two speakers?

F) Move the mic to the side to capture more of the sound of one of the speaker’s voice coils if more high end is required.
Distance Miking image from Bobby Owsinski's Big Picture blog
Figure 7.2: Distance Miking Where The Speakers Converge
G) Move the mic back to the best sounding position close to the speaker and add an additional mic at the spot where the sound of the speakers converge 18 to 24 inches away (see Figure 7.3). Is the sound still full? Did it get brighter? Did it get bassy? Did it get bigger sounding? Is it closer to what you heard in the room? Is there more of the room sound?

H) Increase the distance to 6 feet if possible. Is the sound still full? Did it brighter? Did it get bassy? Is there more of the room sound?

I) Place both mics at the point where they give the sound closest to what you heard in the room, or what best fits the track when the other instruments are playing."
Close and Distance Miking image from Bobby Owsinski's Big Picture blog
Figure 7.3: Close and Distance Miking
Go to bobbyowsinski.com to read more excerpts from this and other books.
----------------------------------

You should follow me on Twitter for daily news and updates on production and the music business.

Don't forget to check out my Music 3.0 blog for tips and tricks on navigating social media and the new music business.

LinkWithin

Related Posts Plugin for WordPress, Blogger...