Get This Free Cheat Sheet Guaranteed To Help Your Next Mix

Showing posts with label mixing engineers handbook. Show all posts

Wednesday, March 9, 2016

5 Steps To Punchy Drum Compression

Drum Compression imagePunchy drums are what every engineer aims for in a mix and there's definitely a way to get there. Sometimes just using the right compressors can do the trick, but most of the time it requires some adjustment of the parameters to really get the sound you're looking for.

Here's a few excerpts from my Mixing Engineer's Handbook, Audio Mixing Bootcamp and Drum Recording Handbook books all culled together for an overview on drum compression.

"It would be great if every drummer hit every beat on the kick and snare with the same intensity, but unfortunately that doesn’t even happen with the best drummers on the planet. When the intensity changes from beat to beat, the pulse of the song feels erratic, since even a slight change in level can make the drums feel a lot less solid than they should be. Compression works wonders to even out those erratic hits and helps to push the kick and snare forward in the track to make them feel more punchy. Let’s take a look at how to do that with the drums.

The Compression Technique
Before we get into specifics, here’s the technique for setting up a compressor. Regardless of the instrument, vocal or audio source, the set up is basically the same.
1. Start with the attack time set as slow as possible, and release time set as fast as possible on the compressor. 
2. Turn the attack faster until the instrument begins to sound dull (this happens because you’re compressing the attack portion of the sound envelope). Stop increasing the attack time at this point and even back it off a little so the sound stays crisp.
3. Adjust the release time so that after the initial attack, the volume goes back to at least 90 percent of the normal level by the next beat. If in doubt, it’s better to have a shorter release than a longer one.
4. Set to the lowest ratio above 1:1 (which means no compression). Usually on drums, the lowest ratio provides the most punch, since it lets the transients of the drum be heard. 2:1 or 1.5:1 work great.
5. Bypass the compressor to see if there’s a level difference. If there is, increase the Gain or Output control until the volume is the same as when it’s bypassed.
Tracking Versus Mixing
Generally speaking, most engineers won’t compress much, if at all, during tracking, since anything you do while recording can’t be undone later. That said, some engineers like to limit the instruments a little (only by a dB or two) just to control the transients a bit. A compressor becomes a limiter when the ratio is set to 10:1 or more. If you choose to do this, make sure that the limiter kicks in on only the highest peaks. If it’s limiting constantly, it’s probably too much and you might regret it later since it can't be undone. Decrease the threshold control so it only limits on the occasional transient.

Compressing The Kick And Snare
The biggest question most engineers have when compressing either the kick or snare is “How much is enough?” This depends first and foremost on the sound of the drum itself and the skill of the drummer. A well-tuned drum kit that sounds great in the room should record well, and a reasonably good drummer with some studio experience usually means that less compression is needed because the hits are fairly even. Even a great drummer with a great sounding kit can benefit from a bit of compression though, and as little as a dB or two can work wonders for the sound. With only that amount, the setup of the compressor is a lot less crucial, especially the attack and release.

Sometimes you need the kick or snare to cut through the mix and seem as if it’s in your face, and that’s when 3 to 6dB or so does the job. It’s here that the setup of the compressor is critical because you’re imparting its sound on the drum. Make sure you tweak the attack and release controls as above, and even try a number of different compressors. You’ll find they all react differently, even with the same settings, so it’s worth the time to experiment. Remember: if the attack is set too fast, the drum will sound less punchy, regardless of how much compression you use.

Compressing The Room Mics
The room ambient mics are meant to add the “glue” to the sound of a kit, and can really benefit from a fair amount of compression, which means anywhere from 6 to 10dB. In fact, many mixers prefer the room sound to be extremely compressed, with way more than 10dB being the norm.

The problem is that the more compression you use, the more the ambience of the room is emphasized. That’s okay if you’re recording in a great sounding room, but if it has a lot of reflections and the ceiling is low, you may be emphasizing something that just doesn’t add much to the track. One trick is to actually set the attack time so it’s much shorter than usual to cut off the sound of the initial drum transient, then tuck the room tracks in just under the other drum tracks.

Note that regardless of how good the room mics sound, the more of them you use, the less space there will be for the other instruments in the track. The more instruments there are, the more you’ll have to back them off. Sad but true, but unfortunately, there’s only so much sonic space to any mix."


Wednesday, January 20, 2016

EQing For Size

EQing for Size image
Figure 7.5: EQing for Size
Usually when we EQ elements of a mix we're doing it to make everything fit. That means juggling frequencies so that there are no clashes, and making mix elements smaller. This happens when we have large mixes with lots of tracks.

Sometimes there aren't that many tracks to worry about though (like for live recordings, or blues or jazz), so we more interested in increasing the sonic size of the tracks. Here's an excerpt from my Mixing Engineer's Handbook that describes how to do that in 4 easy steps.

"Making a sound bigger or larger than life usually comes from the addition of bass and sub-bass frequencies in the 40Hz to 250Hz range, although most will come from an area just below 100Hz, a region just above 100Hz, or both.

For use the method, the low frequency band of your EQ must be sweepable.
1. Set the Boost/Cut control to a moderate level of Boost (8 or 10 dB should work).

2. Sweep through the frequencies in the bass band until you find the frequency where the sound has the desired amount of fullness.

3. Adjust the amount of boost to taste. Be aware that too much boost will make the sound muddy.

4. Go to the frequency either 1/2 or twice the frequency that you used in #2 and add an amount of that frequency as well. Example: If your frequency in #2 was 120Hz, go to 60Hz and add a dB or so as well. If your frequency was 50Hz, go to 100Hz and add a bit there (see Figure 7.5)."


Wednesday, December 23, 2015

6 Editing Tips For Solid Natural Tracks

Timing Releases image from The Mixing Engineer's Handbook
Mix engineers are called on to do so much more than ever before.

Tweaking the track timing used to be done way before the mixing stage, but mixers find themselves doing it more and more.

Here are some tips for tweaking track timing in you DAW from the new Advanced chapter in the 3rd edition of The Mixing Engineer's Handbook.
------------------------
"No matter how great the players on the session are, there’s always some portion of a recording that doesn’t feel quite right. Usually, the timing of the basic tracks will be tweaked right after your tracking session so you have a solid rhythm section to overdub against, but if you’re just now discovering some sections of an overdub that don’t feel right (which happens more than you might think), prepare for the joys of slipping and sliding time.

Here’s a list of some of the do’s and don’ts for tweaking the track timing:
  • Don’t edit by eye. In most music (electronic music being the exception), you can’t successfully edit by just trying to line everything up to the kick and snare or the grid and still have it sound natural and human. Often times, tracks that look perfectly lined up don’t sound or feel right, which is why listening is more important than looking. Turn your head away from the monitor or close your eyes and just listen before and after you move anything.
  • Every beat doesn’t have to be perfect. In fact, if it’s too perfect, you’ll suck the life out of the performance. Unless something really jumps out as being out of time, you might get away with leaving it as is. Another way is to just line up downbeats and any major accents, which gives you the best of both worlds; a loose feel that still sounds tight.
  • Copy and paste another section if you can. If you have to make too many edits to a particular section, chances are it won’t sound as good when you’re finished as just finding a similar section in another part of the song and pasting it in over the area that’s suspect. It’s a lot faster and easier to do, and will probably sound cleaner and groove better as well.
  • Everything doesn't have to line up exactly. Many times the bass will speak better if it’s a few milliseconds behind the kick drum rather than right with it. It still sounds tight, but both the kick and bass will be more distinct and the sound may even be fuller.
  • Listen against the drums. If you listen to the track that you’re editing all by itself, you can be fooled into thinking that the timing is correct when it’s not, especially if you’re editing to a grid. The real proof is when you listen against the drums. If the instrument sounds great by itself and great with the drums, you’re home free.
  • Trim the releases. This is one of the best things you can do to tighten up a track. Everyone is hip to tightening up the attacks, but it’s the releases that really make the difference. Regardless if it’s an accent played by the full band, the song ending, or a vocal or guitar phrase, make sure that the releases are pretty much the same length. If one is longer than the rest, trim it back and fade it so it sounds natural. If one is a lot shorter than the rest, use a time correction plug-in the lengthen it a bit (see the graphic on the left).
Of course, if you’re using loops or MIDI instruments, you’ve probably quantized things to the track by now. If you haven’t, remember that if it’s too perfect to the grid it may not sound natural."

To read additional excerpts from The Mixing Engineer's Handbook and other books, go to bobbyowsinski.com.

Monday, November 30, 2015

Cool Cyber Monday Recording Accessories

We all love a deal and Cyber Monday is the day for it, so I decided to put together my own list of cool gear especially for musicians and engineers. Here are some accessory items that make great gifts for any musician or engineer (even yourself).


The X-Clip - If you want to mount an SM57 and a small diaphragm condenser mic right next to one another and keep them in perfect phase, then the X-Clip is just the thing you need. Get one for $19.95, or the Studio Bundle of 3 for $49.95.


Blocklite LED flashlight image


Blocklite - This goes under the category of "Why didn't I think of that?". Blocklite is a simple LED add-on to any 9 volt battery that turns it into a flashlight that's perfect for checking all those dark spaces during a session or show. Cheap too at only $17.95 for a package of 3 including the batteries!


Monoprice 8323 Headphones - Tired of spending big money on replacing trashed headphones? At $22 you won't find a cheaper and better sounding replacement.


Mixing Engineer's Handbook 3rd Edition - Are your mixes not sounding the way you think they should? The latest version of the Mixing Engineer's Handbook (written especially for the home or small studio) comes to the rescue. New interviews and a new "advanced" chapter make it a must have for any musician who records.


Etymonic Research ER20 Earplugs - The best earplugs on the planet, they reduce the volume but don't change the frequency response. I don't know what I'd do without them. You'll use them more than you ever thought. Only $12.99 a pair.


lynda.com online training tutorialsLynda.com - Have you ever wanted to learn a piece of software, but hated the "how-to" videos you found on YouTube with bad audio and lighting and people that barely know what they're doing? Try Lynda.com, with more than 1500 courses with super high production values by experts and in small digestible bites. Check out my courses, and get 7 days free of unlimited access to lynda.com.


Recording Engineer's Handbook 3rd Edition - Not sure how to mic a tabla, marimba or fiddle? Here's the book that will show multiple ways how as well as the principles behind getting a great recording every time. Invaluable to the recording musician.


Pyle Pro PCT 40 Cable Checker - The average studio or sound system today has so many different types of cables that troubleshooting can sometimes be difficult. Enter the PCT40 cable checker, about the most comprehensive unit that you'll find, testing all the audio connection flavors as well as USB, Ethernet and Speakon. A steal at $43.


Snark SN-1 Guitar Tuner - We've all gotten used to using software guitar tuners, but when you want to tune as fast as possible, this is the best tuner I've found. It clips right onto the guitar so you don't even have to plug it in, and it even has a built-in metronome. At $9.95 each, it's unbeatable.

Shop Amazon - Black Friday Deals in Electronics


Wednesday, November 4, 2015

Understanding The Major Frequency Bands

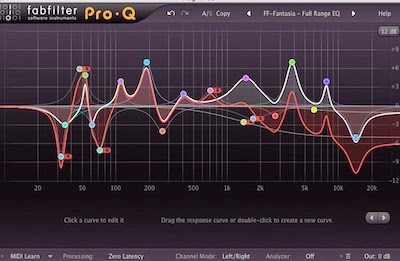
Understanding The Major Audio Frequency Bands
If we need to EQ something during a mix, it's usually because an instrument or vocal is clashing with another track, or something doesn't sound right because there's too much or too little in a range of frequencies.

When it comes right down to it though, the act of EQing becomes a lot easier if we think of the audio frequency spectrum divided into 6 major bands.

Here's an excerpt from my Mixing Engineer's Handbook, that covers the major frequency bands and explains what too much or too little of each one can do to the sound of your track.

"• Sub-Bass - The very low bass between 16 and 60Hz which encompasses sounds which are often felt more than heard, such as thunder in the distance. These frequencies give the music a sense of power even if they occur infrequently. Too much emphasis on this range makes the music sound muddy.

• Bass - The bass between 60 and 250Hz contains the fundamental notes of the rhythm section so EQing this range can change the musical balance, making it fat or thin. Too much boost in this range can make the music sound boomy.

• Low Mids - The midrange between 250 and 2000Hz contains the low order harmonics of most musical instruments and can introduce a telephone like quality to the music if boosted too much. Boosting the 500 to 1000Hz octave makes the instruments sound horn like, while boosting the 1 to 2kHz octave makes them sound tinny. Excess output in this range can cause listening fatigue.

• High Mids - The upper midrange between 2 and 4kHz can mask the important speech recognition sounds if boosted, introducing a lisping quality into a voice and making sounds formed with the lips such as ‘m”, “b,” and “v” indistinguishable. Too much boost in this range, especially at 3kHz, can also cause listening fatigue. Dipping the 3kHz range on instrument backgrounds and slightly peaking 3kHz on vocals can make the vocals audible without having to decrease the instrumental level in mixes where the voice would otherwise seem buried.

• Presence - The presence range between 4 and 6kHz is responsible for the clarity and definition of voices and instruments. Boosting this range can make the music seem closer to the listener. Reducing the 5kHz content of a mix makes the sound more distant and transparent.

• Brilliance - The 6 to 16kHz range controls the brilliance and clarity of sounds. Too much emphasis in this range, however, can produce sibilance on the vocals."

Although we usually refine our EQing to much tighter bandwidths, the list above is a good start and easy to remember. Remember, a little goes a long way.

Wednesday, October 21, 2015

6 Steps To A Perfect Bass And Drums Balance

Huge Kick Drum image
Perhaps the most difficult task of a mixing engineer is balancing the bass and drums (especially the bass and kick). Nothing can make or break a mix faster than how these instruments work together. It’s not uncommon for a mixer to spend hours on this balance (both level and frequency) because if the relationship isn’t correct, then the song will just never sound big and punchy.

Here's an excerpt from The Mixing Engineer's Handbook to help you achieve this sometimes mysterious balance.

"In order to have the impact and punch that most modern mixes exhibit, you have to make a space in your mix for both of these instruments so they won't fight each other and turn the mix into a muddy mess. While simply EQing your bass high and your kick low (or the other way around), might work at it’s simplest, it’s best to have a more in-depth strategy, so to make them fit together, try the following:

1. EQ the kick drum between 60 to120Hz as this will allow it to be heard on smaller speakers. For more attack and beater click add between 1k to 4kHz. You may also want to dip out some of the boxiness that lives between 200 to 600Hz. EQing in the 30 to 60Hz range will produce a kick that you can feel if your speakers are large enough, but that can also make it sound thin on smaller speakers and probably won’t translate well to a variety of speaker systems. Most 22 inch kick drums like to center somewhere around 80Hz, for instance.

2. Bring up the bass with the kick. The kick and bass should occupy slightly different frequency spaces. The kick will usually be in the 60 to 80Hz range whereas the bass will emphasize higher frequencies anywhere from 80 to 250 (although sometimes the two are reversed depending upon the song). Before you continue to EQ at other frequencies, try filtering out any unnecessary bass frequencies (below 30Hz on kick and 50Hz on the bass, although it varies according to style and taste) so the kick and bass are not boomy or muddy. There should be a driving, foundational quality to the combination of these two together.  

A common mistake is to emphasize the kick with either too much level or EQ and not enough on the bass guitar. This gives you the illusion that your mix is bottom light, because what you’re doing is effectively shortening the duration of the low frequency envelope in your mix. Since the kick tends to be more transitory than the bass guitar, this gives you the idea that the low frequency content of your mix is inconsistent. For pop music, it’s best to have the kick provide the percussive nature of the bottom while the bass fills out the sustain and musical parts. 

3. Make sure the snare is strong, otherwise the song will lose its drive when everything else is added in. This usually calls for at least some compression (see Chapter 9 on Dynamics). You may need a boost at 1k for attack, 120 to 240Hz for fullness, and 10k for snap. As you bring in the other drums and cymbals, you might want to dip a little of 1k on these to make room for the snare. Also make sure that the toms aren't too boomy (if so, try rolling them off a bit below 60 Hz first before you begin to EQ elsewhere). 

4. If you’re having trouble with the mix because it's sounding cloudy and muddy on the bottom end, turn the kick drum and bass off to determine what else might be in the way in the low end. You might not realize that there are some frequencies in the mix that aren't musically necessary. With piano or guitar, you're mainly looking for the mids and top end to cut through, while any low-end might be just getting in the way of the kick and bass, so it’s best to clear some of that out with a high-pass filter. When soloed the instrument might sound too thin, but with the rest of the mix the bass will sound so much better, and you won’t really be missing that low end from the other instruments. Now the mix will sound louder, clearer, and fuller. Be careful not to cut too much low end from the other instruments, as you might loose the warmth of the mix.

5. For dance music, be aware of kick drum to bass melody dissonance. The bass line is very important and needs to work very well with the kick drum when it’s reproduced over the huge sound systems commonly found in today's clubs. If your kick has a center frequency of an A note at around 50 or 60Hz and the bass line is tuned to A#, they’re going to clash. Tune your kick samples to the bass lines (or vice versa) where needed.

6. If you feel that you don't have enough bass or kick, boost the level, not the EQ. This is a mistake that everyone makes when they’re first getting their mixing chops together. Most bass drums and bass guitars have plenty of low end and don't need much more, so be sure that their level together and with the rest of the mix is correct before you go adding EQ. Even then, a little goes a long way."


Wednesday, August 19, 2015

A Description Of Each Frequency Band In A Single Word

One of the things I've found over the years is that it's easy to interpret the demands of a client during a mix if you understand what they're trying to get across. It's amazing how just a single word can describe a frequency condition if we know what to listen for.

Here's a chart from The Mixing Engineer's Handbook 3rd edition that describes each frequency band with just a single word (along with some alternates).


Wednesday, April 29, 2015

The 5 Different Song Arrangement Elements Explained

Song Arrangement Elements image
If you're going to be a successful producer or a mixing engineer, it's absolutely vital that you understand the 5 kinds of arrangement elements that make up a song. You can have fewer than 5 (most songs do in several places) but having any more than 5 generally confuses the listener.

Here's an excerpt from my Music Producer's Handbook (there's also something similar in my Mixing Engineer's Handbook as well) that explains these elements.

"Some songwriters already have the arrangement worked out in their head as to how they want the rest of the band to play, but for most songwriters (even the most accomplished) that’s a skill that has to be developed or have the job passed on to a specialist. In order to understand how the arrangement influences the song, we have to understand the mechanics of a well-written arrangement first.  

Most well conceived arrangements are limited in the number of elements that occur at the same time. An element can be a single instrument like a lead guitar or a vocal, or it can be a group of instruments like the bass and drums, a doubled guitar line, a group of backing vocals, etc. Generally, a group of instruments playing exactly the same rhythm is considered an element. Examples: a doubled lead guitar or doubled vocal is a single element, as is a lead vocal with two additional harmonies. Two lead guitars playing two different parts are two elements, however. A lead and a rhythm guitar are two separate elements as well.  

Here are the typical arrangement elements that makes up most of modern music:
  • Foundation - The Rhythm Section. The foundation is usually the bass and drums, but can also include a rhythm guitar and/or keys if they’re playing the same rhythmic figure as the rhythm section. Occasionally, as in the case of power trios, the Foundation element will only consist of drums since the bass will usually have to play a different rhythm figure to fill out the sound, so it becomes it’s own element.  
  • Pad - A Pad is a long sustaining note or chord. In the days before synthesizers, a Hammond Organ provided the best pad and was joined later by the Fender Rhodes electric piano. Synthesizers now provide the majority of pads but a real string section or a guitar power chord can also suffice.  
  • Rhythm - Rhythm is any instrument that plays counter to the Foundation element. This can be a double time shaker or tambourine, a rhythm guitar strumming on the backbeat, or congas playing a Latin feel. The Rhythm element is used to add motion and excitement to the track.
  • Lead - A lead vocal, lead instrument or solo. 
  • Fills - Fills generally occur in the spaces between Lead lines, or can be a signature line.  You can think of a Fill element as an answer to the Lead.  
Remember that usually there should not be more than four elements playing at the same time. Sometimes three elements can work very well. Very rarely will five simultaneous elements work together."


Wednesday, April 15, 2015

5 Simple EQ Tips That Work On Anything

Equalization image
Equalization is one of the most difficult parts of recording to get the hang of since there's literally almost an infinite number of possibilities.

Most of us learn by experience and usually massive amounts of trial and error, but there are some brief general guidelines that can be an enormous help for those new to the process.

Here's an excerpt from The Mixing Engineer's Handbook 3rd edition featuring 5 simple EQ tips that will work in just about any situation.
1. If it sounds muddy, cut (decrease the level) at around 250Hz. Although you can get that muddy sound from other lower frequencies (especially anything added below 100Hz), start here first. 
2. If it sounds honky or veiled, cut at around 500Hz. This is where a huge build-up of energy occurs when close-miking instruments because of the proximity effect that naturally occurs with directional mics. Just cutting a bit in this area can sometimes provide instant clarity. 
3. Cut if you're trying to make things sound clearer. If the sound is cloudy, there's usually a frequency band that's too loud. It's easier to decrease it than to raise everything else. 
4. Boost if you're trying to make things sound different. Sometimes you don't want clarity as much as you want something to sound just different or effected. That's the best time to boost EQ. 
5. You can't boost something that's not there in the first place. You may be better off to decrease other frequencies than try to add a huge amount, like 10 or 15dB, to any frequency band.
Although there are exceptions to every one of the above guidelines, you'll always stay out of sonic trouble if you consider this tips first.


Don't forget to check out my Music 3.0 blog for tips and tricks on navigating social media and the new music business.

Wednesday, March 11, 2015

The 6 Elements Of A Great Mix

Music mixing image
In a previous post I outlined the attributes of an amateur mix, so now is a good time to discuss the 6 elements of a great mix.

Every piece of modern music, meaning rock, pop, R and B, hip hop, country, new age, swing, drum and bass, trance and every other genre having a strong backbeat, has six main elements to a great mix. They are:
  • Balance - the volume level relationship between musical elements
  • Frequency Range - all frequencies are properly represented
  • Panorama - every musical element is well-placed in the soundfield
  • Dimension - added ambience to a musical element
  • Dynamics - controlling the volume envelope of a track or instrument, and
  • Interest - finding something in the mix that makes it special
Many beginning mixers have only four or five of these when doing a mix, but all of these elements must be present for a great mix, as they are all equally important. 

To take it a step further, most great mixers think in three dimensions at least on a subconscious level. They think “Tall, Deep and Wide,” which means they make sure that all the frequencies are represented, the mix has depth, and has some stereo dimension as well.
  • The “Tall” dimension (or the frequency range of an instrument or mix) is the result of the mixer determining that all the frequencies of the mix are properly represented. Usually that means that all of the sparkly, tinkly highs and fat, powerful lows are there. Sometimes some mids need to be cut or other frequencies need to be added, but regardless of what's added or subtracted, there's a clarity to each instrument.
  • The Effects or “Deep” dimension is achieved by introducing new ambience elements into the mix. This is usually done with reverbs and delays (and offshoots like flanging and chorusing) but room mics, overheads and leakage can play an equally big part as well.
  • The panning or “Wide” dimension is achieved by placing a audio element in the sound field in such a way as to make the mix more interesting, and so that each element is heard more clearly.
You can read about these mix elements in more detail in The Mixing Engineer's Handbook, and you get read excerpts from my other books on the excerpts section of bobbyowsinski.com.

Don't forget to check out my Music 3.0 blog for tips and tricks on navigating social media and the new music business.

Thursday, February 26, 2015

The Top 5 Mixing Mistakes And How To Avoid Them

audio mixing image
Every day someone asks me to listen to a mix and give my opinion. I wish I had time to do it more than I do, but unfortunately I can't always get around to it. That said, there are a number of mistakes that keep cropping up with the mixes I do hear. Here are the top 5 mixing mistakes that I come across.

1. The vocal or lead instrument gets lost. Words get lost or the vocal seems buried during certain sections of the song. This is what automation is for. Go back and ride that sucker so every word can be heard.

2. There's a big frequency build up from adding EQ at the same frequencies to a lot of tracks. Everything sounds better with EQ added, especially when it's soloed. The problem is that if you EQ most of your tracks at the same frequencies, you'll end up with a lot of tracks that sound great by themselves that fight each other when added to mix. Better to do your EQing without soloing, or solo up several channels at the same time, in order to avoid the problem. And remember that you don't always have to boost the EQ. Attenuating a frequency can be more effective.

3. The stereo spectrum is mushy. This comes from taking panning for granted and automatically panning stereo elements hard left and hard right. When that happens it no longer sounds like stereo anymore and becomes "Big Mono" as my buddy mixer Ed Seay calls it. Just because a keyboard is in stereo, it doesn't necessarily mean that it should be panned hard left and hard right. The same goes for overheads. Many mixers intentionally stay away from hard left and right and try to give every track it's own place in the stereo spectrum.

4. There's too much compression. As the great engineer Joe Chiccarelli stated in my Mixing Engineer's Handbook, "Compression is like this drug that you can’t get enough of. You squish things and it feels great and it sounds exciting, but the next day you come back and you say, “Oh God, it’s too much.” Sometimes you have to really squash something so it works in the mix, but usually a little goes a long way.

5. There's too much low EQ. It's very easy to get fooled into thinking that you don't have enough low end either because you're mixing on small nearfield monitors or you're mixing too quietly. When that happens, you'll find that the mix sounds great in your room but way to boomy everywhere else. Take a listen to a recording that you really love first to see where the low end is at or take a look at a spectrum analyzer before you add any.

If you want to get some great mixing tips and tricks, check out my 101 Mixing Tricks coaching program and get 4 free tricks right away.

Don't forget to check out my Music 3.0 blog for tips and tricks on navigating social media and the new music business.

Tuesday, July 15, 2014

The 4 Families Of Compressors

compressors image
Ever wonder why there are so many different compressors and why they all sound different? That's because back in the analog days there were a number of different ways to achieve compression depending upon the type of electronic building block that you used. Here's a brief excerpt from The Mixing Engineer's Handbook that covers the 4 families of compressors that we generally use today.

"In the days of analog hardware compressors, there were four different electronic building blocks that could be used to build a compressor. These were:
  • Optical: A light bulb and a photocell were used as the main components of the compression circuit. The time lag between the bulb and the photocell gave it a distinctive attack and release time (like in an LA-2A). Optical compressors don't react very fast to the oncoming signal, but that actually makes then sound pretty smooth, which is why they've become a favorite on vocals and bass.
  • FET: A Field Effect Transistor was used to vary the gain, which had a much quicker response than the optical circuit (a Universal Audio 1176 is a good example). FET compressors are often used on drums because of their quick response.
  • VCA: A Voltage Controlled Amplifier circuit was a product of the 80s and had both excellent response time and much more control of the various compression parameters (the dbx 160 series is an example of a VCA-type compressor, although some models didn’t have a lot of parameter controls). VCA compressors can be very aggressive, which is why the dbx 160 series have long been a favorite on rock kick and snare.
  • Vari-Gain: The vari-gain compressors are sort of a catch-all category because there are other ways to achieve compression besides the first three (like the Fairchild 670 and Manley Variable Mu). You might think of a vari-gain as the ultimate smooth sounding compressor because it was originally made for a radio signal chain, something that had to be as transparent as possible. That said, it's hard to beat a vari-gain compressor across the mix buss for the added "glue" that's difficult to get any other way.
As you would expect, each of the above has a different sound and different compression characteristics, which is the reason why the settings that worked well on one compressor type won’t necessarily translate to another. The good thing about living in a digital world is that all of these different compressor types have been duplicated by software plugins, so it’s a lot easier (not to mention cheaper) to make an instant comparison on a track and decide which works better in a particular situation."

To read additional excerpts from The Mixing Engineer's Handbook and my other books, go to the excerpts section of bobbyowsinski.com. Also check out The Audio Mixing Bootcamp video course on Lynda.com.
----------------------------------

Tuesday, April 22, 2014

EQing The Nashville Way

Ed Seay in action image
One of the best engineers on the planet is my good buddy Ed Seay, who has a long history of mixing hits for country greats like Blake Shelton, Lee Brice, Martina McBride, Ricky Skaggs, Dolly Parton, Pam Tillis, Highway 101, and Collin Raye, among many others. Ed has a great way of explaining how he equalizes a track that he so kindly shared in my Mixing Engineer's Handbook 3rd edition.

"I just try to get stuff to sound natural, but at the same time be very vivid. I break it down into roughly three areas: mids, the top and the bottom; then there’s low mids and high mids. Generally, except for a very few instruments or a few microphones, cutting flat doesn’t sound good to most people’s ears, so I’ll say, "Well, if this is a state of the art preamp and a great mic and it doesn’t sound that great to me, why?" Well, the mid range is not quite vivid enough. Okay, we'll look at the 3k, 4k range, maybe 2500. Why don’t we make it kind of come to life like a shot of cappuccino and open it up a little bit? Then maybe I’m not hearing the air around things, so let’s go up to 10k or 15k and just bump it up a little bit and see if we can kind of perk it up. Now all that sounds good but our bottom is kind of undefined. We don’t have any meat down there. Well let’s sweep through and see what helps the low end. Sometimes, depending on different instruments, a hundred cycles can do wonders for some instruments. Sometimes you need to dip out at 400 cycles, because that’s the area that sometimes just clouds up and takes the clarity away, but a lot of times adding a little 400 can fatten things up. 

On a vocal sometimes I think, "Does this vocal need a diet plan? Does he need to lose some flab down there?” Sometimes we need some weight on this guy so let’s add some 300 cycles and make him sound a little more important. It’s kind of contouring. 

Also frequency juggling is important. One of the biggest compliments people give me is that they say, “You know, Ed, on your mixes, I can hear everything.” There are two reasons for that. One is, I’ve pushed things up at the right time when they want to hear it, but the other thing is I don’t EQ everything in the same place. You don’t EQ 3k on the vocal and the guitar and the bass and the synth and the piano, because then you have such a buildup there that you have a frequency war going on. Sometimes you can say, "Well, the piano doesn’t need 3k, so let’s go lower, or let’s go higher." Or, "This vocal will pop through if we shine the light not in his nose, but maybe towards his forehead." In so doing, you can make things audible and everybody can get some camera time."

To read additional excerpts from The Mixing Engineer's Handbook 3rd edition and my other books, go the excerpts section of bobbyowsinski.com.
----------------------------------

Wednesday, April 16, 2014

An Interview With Bassy Bob Brockman

"Bassy" Bob Brockman image
“Bassy” Bob Brockman has a wide range of awards and credits, including more than 30 Grammy nominations with two wins, and an Oscar nomination. His many credits include Mary J. Blige, Toni Braxton, Brian McKnight, Faith Hill, Korn, Christina Aguilera, P Diddy, Santana, and Sting among many others. In this excerpt from The Mixing Engineer's Handbook 3rd edition, Bob discusses what he uses for plugins and his use of the mix buss compressor.

"Can you hear the final product in your head when you begin to mix?
Yeah, probably. I think that I probably make some subconscious and non-verbal judgements when I first hear a song. I make a judgement on style and then go through a couple hours familiarizing myself with all the parts, then I try to see what’s really crucial and what could be wallpaper. I then find whether there’s something that’s really important that I should make the listener aware of. 

The first 20 years of my career I had a producer standing right next to me, telling me what parts were important. It’s less so now because I see so fewer people. I get sent digital files and I sort of end up making those mix/production decisions on my own and end up delivering a more or less finished mix to the producer or the band, then I’ll get notes on what to tweak.

Are you mixing on a console or in the box?
I can mix in the box if I have to but it’s certainly not my preferred way of mixing. What I’m into is a sort of hybrid mixing. I have a Neve 8816 [analog console] with 16 channels coming out of an Avid 192 D/A with an Alan Smart C2 compressor across the mix buss. 16 channels of analog makes a big difference to me in terms of power and depth of field. I still do mix quite a few things in the box though, especially when I’m out traveling.

How much of the DAW do you use?
I’m very deep into the whole digital mixing process and do all of my work in Pro Tools. The plugins have stepped up a lot in the last few years, with the distortion and saturation plugs having improved immeasurably. They’re now more transparent and not adding a lot of phase shift or distortion when you insert them. That was my problem with plugs before and why I would tend not to use them on phase dependent things like drums and guitars. At a certain point, maybe the seventh or eighth hour the mix, the whole thing would start to sound crunchy to me, so I would go in and bypass the plugs and realize that I was using them as crutch to make things speak. Once you get things dialed in, by the end of the mix you don’t need them as much, so there’s a lot more sonic purity.

I often encourage young mixers to bypass their plugs and listen to what they have, especially in a program like Logic where when you open up a session it’s already got three or four things inserted across every channel as a default. 

Do you have certain effects that you always set up before you begin a mix?
I typically transfer all of my effects from one song to the next. I’ll usually use an [Soundtoys] Echo Boy or a [Massey] TD5 for delay. The [Waves] H-Delay and the [PSP] lexicon PCM42 are really nice as well. I usually have four or five delays which vary from very tight to slap delays to timed things. I tweak the timing so its either pushing or dragging a bit behind the beat. I usually have four or five reverbs all plugged in as well. I don’t have any analog effects processing. It’s all done in the box.

I do have a pair of Neve 1073’s that I might insert across the stereo buss, but for the most part I’ll just leave the equalization to the mastering guy. I try to get the EQ and the sound from what I’m doing to the individual tracks in the mix. I’ve never been much of a user of equalization over the years. I’ve worked with a lot of master buss equalizers like the Massenburg stuff, but there are so many equalization things that happen to the sound just by making adjustments on the Alan Smart [SSL-clone compressor]. It’s such an amazing compressor with the way it grabs the low end and accentuates certain parts of the mid-range or upper mid-range depending upon how fast or slow and the ratio. 

I usually spend the last two hours of my mix not doing much mixing but listening and then making little adjustments to the master buss compressor and hearing what the impact is to all the parts. I definitely don’t have a stock compression setting. I’m always moving the setting around on everything that I do. Each song has to have it’s own contour I guess.

How hard are you hitting it?

That depends on the music. If I’m doing a dance record I’m probably hitting it pretty hard. If I’m doing an aggressive rock record then I’m sinking into it about 3 or 4 dB. If I’m doing something much more open or acoustic I’m barely hitting it. Most of the effect is how it’s putting the low frequency information in check, which it does without the meter moving at all. Even when you’re hitting it very lightly it still has a dramatic effect on the music."

You can read additional excerpts from The Mixing Engineer's Handbook and my other books on the excerpt section of bobbyowsinski.com.


Tuesday, February 25, 2014

Dave Pensado: Working The Low End Of A Mix

Getting the low end of the mix is one of the most difficult things in mixing in that if you don't get it right, you may lose the power of the mix, make the mix too muddy, or cover up either the kick or the bass. The idea is to hear both the kick and the bass and have them work together so you can feel the pulse of the song. Here's an Into the Lair segment video from mix master Dave Pensado as he explains how to control the low end of the mix.

If you're hip to Pensado's Place, you know that Dave is all about sharing what he knows and what his guests know in order to help you improve your mixing and your music. Having known Dave for a long time, I can tell you that he's a southern gentleman who's exactly the same in real life as he is on his show: genuine, true, passionate and insightful, and all that comes across in this video.

Here Dave demonstrates many of the techniques that are covered in The Mixing Engineer's Handbook (here's an excerpt from his interview in the book), such as:

1. Using a high-pass filter to attenuate some unwanted frequencies that can cloud up a mix.

2. Add both girth and clarity to each instrument.

3. Finding space in the frequency spectrum for both instruments to live so neither covers the other up.

4. Using the compressor to bring out the punch and low end of the instrument by controlling its attack and release.

Check it out.


----------------------------------

You should follow me on Twitter and Facebook for daily news and updates on production and the music business.

Don't forget to check out my Music 3.0 blog for tips and tricks on navigating social media and the new music business.

Monday, February 24, 2014

Enhance Your Hearing With Darkness

Mixing Console image
Conventional mixing wisdom has always had it that a little bit of quiet before you mix can help you better zero in on the details of a mix. In fact, that's one of the tips in personal prepping for your mix as outlined in The Mixing Engineer's Handbook and Audio Mixing Bootcamp books.
"Try to stay in the most quiet area that you can for as long as you can before you begin your mix. Concentrate on the sounds that you’re hearing and try to identify what they are and the direction they’re coming from. Studies have found that this can make your hearing much more acute."
The books go on to provide another useful tip that many mixers employ while mixing that many dub The Ray Charles Effect:
"Also remember that closing your eyes while mixing can sometimes improve your hearing by both lessening the distractions and allowing your brain to concentrate additional processing power on that sense."

While this was mostly empirical knowledge, a new study by researchers at the University of Maryland and Johns Hopkins University have found that a temporary loss of vision does indeed improve your hearing. The findings were published in the peer review publication Neuron and found that the brains of adult mice could be rewired to compensate for vision loss by improving their hearing. 

Of course, anyone who has spent at a little time around Stevie Wonder knows how acute his sense of hearing is, as is that of all blind people. We didn't need a study to confirm that.

But what it does confirm is that by just sitting in a quiet dark room before you mix, or closing your eyes during a mix, can often allow you to zero in a things in a mix that you missed before. And lowering the lights in the mixing area has always been done for a good reason, whether we realized or not. Give it a try. Go to laboratoryequipment.com read a synopsis of the article.

----------------------------------

You should follow me on Twitter and Facebook for daily news and updates on production and the music business.

Don't forget to check out my Music 3.0 blog for tips and tricks on navigating social media and the new music business.

Tuesday, January 21, 2014

The Different Types Of Reverb

Reverb. It's use goes through cycles from a lot to almost none, but you'll usually find at least some reverb-type ambience used in every mix. The problem is that you can't really tell much of a distinction between the different types of some inexpensive plugins or boxes. In case you're a little fuzzy about the differences between the types of reverb available, here's a little refresher excerpt from The Mixing Engineer's Handbook 3rd edition.

"There are five primary categories of reverb, all with a different sonic character; three of these are actual acoustic spaces, one is an analog way to reproduce one, and one is not found in nature but can really sound cool. The reason why there’s a difference is that just like everything else in music and audio, there are many paths to the same end result. You’ll find that every digital reverb plugin or hardware unit provides its own version of these sounds.

Hall: A hall is a large space that has a long decay time and lots of reflections. Sometimes there’s a subcategory of the hall reverb called “church,” which is just a more reflective hall with a longer decay.

Room: A room is a much smaller space that can be dead or reflective, depending upon the material that the walls, floor and ceiling are made of. It usually has a short decay time of about 1.5 seconds or less.

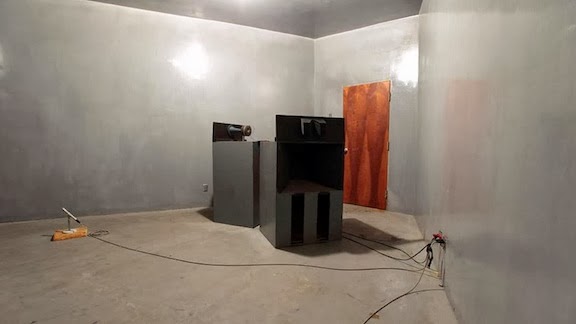
Acoustic Chamber image from Bobby Owsinski's Big Picture production blog
Figure 1: An Acoustic Chamber
Chamber: An acoustic chamber is a dedicated tiled room that many large studios used to build in order to create reverb (see Figure 1). Phil Spector’s “Wall of Sound” was built around an excellent acoustic chamber at Gold Star Studios in Hollywood (long since closed unfortunately), for example. The acoustic chambers at Capitol Studios, designed by Les Paul himself, still have a reverb sound that is revered by mixers everywhere. Other common artificial spaces used as acoustic chambers include showers and stairwells.


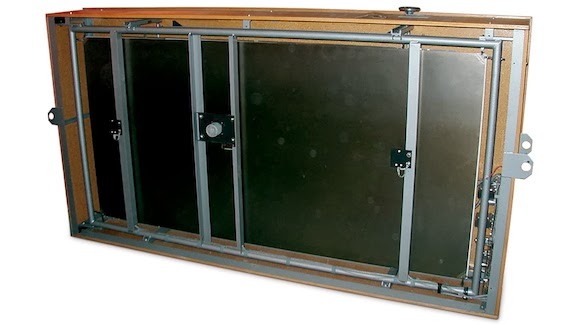
Plater reverb image from Bobby Owsinski's Big Picture production blog
Figure 2: A Plate Reverb

Plate: A plate is a 4 foot by 6 foot hanging piece of sheet metal with transducers attached to it that many studios used for artificial reverb when they couldn’t afford to build a chamber (see Figure 2). The first plate reverb was the EMT 140, developed in the late 1950s, and is still held in high esteem by many mixers for its smooth sound.


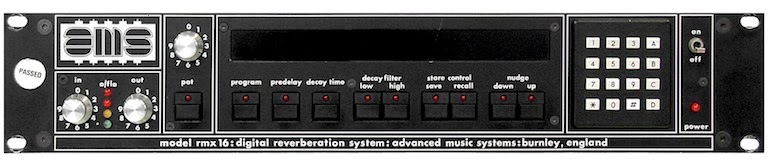
AMS RMX 16 Digital Reverb image from Bobby Owsinski's Big Picture production blog
Figure 3: The AMS RMX 16 Digital Reverb
Non-Linear: The non-linear category is strictly a product of modern digital reverbs as the sound isn’t found anywhere in nature. While natural reverbs decay in a rather smooth manner, once a reverb is created digitally, it’s possible to make that decay happen in unusual ways. The reverb tail can be reversed so it builds instead of decays, or it can be made to decay abruptly, both of which makes the decay “non-linear.” This preset was a popular mixing effect used on drums during the 80’s when the feature first became available on the AMS RMX 16 digital reverb (see Figure 3).

As to which reverb category to use, that’s strictly up to the taste of the mixer and how he sees it fitting with the song. Many mixers might always use a room or a chamber on drums, a plate on vocals or guitars, and a hall on strings or keyboards, while others may do just the opposite. Many might refine the sounds of each and finally settle on a few that they feel always work in a particular situation with a certain instrument or vocal. It’s all up to experience.

All of these reverbs can be modeled using what’s known as a “convolution reverb” that uses an quick burst of audio energy (called an impulse) to excite the room or device, which then allows it to sample its parameters. Examples of convolution reverbs include the Audio Ease Altiverb and Avid’s TL Space."

----------------------------------

You should follow me on Twitter and Facebook for daily news and updates on production and the music business.

Don't forget to check out my Music 3.0 blog for tips and tricks on navigating social media and the new music business.

LinkWithin

Related Posts Plugin for WordPress, Blogger...