Sometimes getting an electric guitar center is dead easy and other times getting the sound to fit into the track seems like the most difficult thing in the world. Here's an excerpt from my
Audio Recording Boot Camp book that provides an almost foolproof method for miking a guitar amplifier.
"Electric guitar recording has evolved through the years, from miking the amplifier from a distance, to close miking, to using multiple mics, to recording direct and finally using an amplifier emulator. No one technique is better than another. In fact, multiple techniques are frequently used on the same recording.
Electric guitars don’t have need anything fancy to capture them. The frequency response doesn’t go that high or that low, and the more distorted it is, the fewer transients the signal has, making it somewhat easier to capture than other instruments. Has a result, dynamic mics are frequently used with good results. That said, sometimes it’s surprising just how good an amp can sound when a large diaphragm condenser or ribbon mic is used, so don’t be afraid to experiment.
Miking The Speaker Cabinet
While many engineers like to use our friend the Shure SM57 in this role, just about any mic can work if you know the sound that you’re looking for and the best way to approach it.
Classic Setup One - Close Miking The Cabinet
 |
| Figure 1: The standard cabinet miking technique |
A) If there are more than one speaker in the cabinet, listen to them all to find the one that sounds the best. Is one scratchy sounded or distorted? Is one muffled with no high end? Does one have no low end? Find the one with the best balance of frequencies that’s not intentionally distorted.
B) Place the mic about one inch away from the best sounding speaker in the cabinet and about three quarters of the way between the edge of the speaker and the voice coil (away from the voice coil). Have the guitar player play the song you’re about to record and listen on the monitors. Does it sound like what you heard in the room? Is the sound full enough? Is it too edgy? Is it too bassy?
C) Move the mic towards the voice coil (the center of the speaker - see Figure 1)). Is the sound still full? Did it brighter? Did it get bassy?
D) Move the mic towards the outside edge of the speaker. Is the sound still full? Did it brighter? Did it get bassy?
Classic Setup Two - Distance Miking Where The Speakers Converge
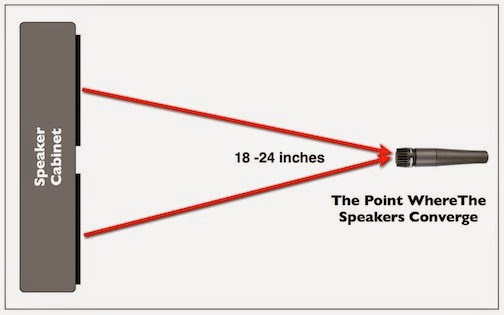 |
| Figure 2: Distant miking |
E) Move the mic about at least a foot away from the the speaker or speakers to capture some of the room sound. The ideal distance on a cabinet with two speakers is where the output of both speakers combine (see Figure 2). Does it sound bigger? Can you hear the sound of the room in the recording? Can you hear some frequencies cancel out between the two speakers?
F) Move the mic to the side to capture more of the sound of one of the speaker’s voice coils if more high end is required.
Classic Setup Three - Close and Distance Miking
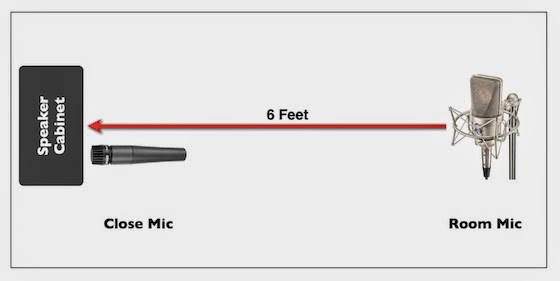 |
| Figure 3: Close and distance miking |
G) Move the mic back to the best sounding position close to the speaker and add an additional mic at the spot where the sound of the speakers converge 18 to 24 inches away. Is the sound still full? Did it get brighter? Did it get bassy? Did it get bigger sounding? Is it closer to what you heard in the room? Is there more of the room sound?
H) Increase the distance to 6 feet if possible (Figure 3). Is the sound still full? Did it brighter? Did it get bassy? Is there more of the room sound?
I) Place both mics at the point where they give the sound closest to what you heard in the room, or what best fits the track when the other instruments are playing."
By following this guideline, you should end up with a guitar sound that fits your track well without having to resort to any EQ or effects.
To
read additional excerpts from the Audio Recording Basic Training book, go to the excerpts section of
bobbyowsinski.com.
----------------------------------


