One of the things that would happen regularly back in the early days of artificial reverb (especially when plates came along but way before digital reverbs) is that one of the ways to tune a reverb was to add an EQ on the send before the actual reverb itself. Usually the EQ was set more to cut than to boost (although you'd boost it if you wanted a bright sounding plate), but if done well, the reverb would suddenly fit a lot better in the track. In fact, back in the classic days of the big studios, this was done in the back room and not left up to the engineer at the console, and it became one of the reasons for clients wanting to work there. They loved the sound of their reverbs.
We can use those same techniques today using reverb plugins on our DAW. Just remember that it usually sounds best if the EQ is placed before the reverb, not after it. Here are 3 EQ curves that I use all the time.
Vocal Reverb
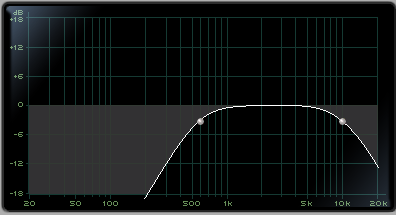
One of the things about reverb is any low end just muddies up the track, and high end may stick out too much, that's why we want to roll each end of the frequency spectrum off a bit, in this case at 200Hz and 10kHz. When we're using reverb on vocals, sometimes it fits a lot better if there's also a bit of an EQ scoop in the mid-range around 2kHz where the consonants of the vocal live. It looks like the curve on the left.
For instruments, I like the Abbey Road curve, which is what they've used on their reverbs since the 60's. This means that the low end is rolled off at 600Hz and the high end at 10kHz. This curve makes any reverb sound a lot smoother and fit better with the track. You'll find that by adding more reverb, you just increase the depth without it sounding washed out. Off course, too much of a good thing is no good either, so be judicious with the amount you add.
Sometimes reverb on the drums is the toughest of all in that you want depth without calling attention to the ambience. A good way to do that is a variation of the Abbey Road curve where the high end is severely rolled off to 6k, 4k, or ever 2kHz! You'll find that you'll have some depth without the ambience ever calling attention to itself.
While these EQ curves work great with reverbs, don't be afraid to try them with delays as the results are very similar. You'll get depth without hearing much of the delay itself. Of course, if you want to really hear the reverb or delay, go the opposite way and increase the high end and the effect will jump right out of the track.
There are a lot more tips and tricks like this in The Mixing Engineer's Handbook, and you can read some excerpts on my website.
----------------------------------
You should follow me on Twitter for daily news and updates on production and the music business.
Don't forget to check out my Music 3.0 blog for tips and tricks on navigating social media and the new music business.


9 comments:
Fascinating!
Those EQ curves look very much like the ones I use. It's quite valitating to see that I'm on the right track.
Cheers
I'm at the last stages of mixing an album and the one thing that has been holding me up more than anything is the use of reverb and trying to get it to sit right. Talk about perfect timing, this article helped me a lot! A couple of applications of the Abbey Road curve and things sound MUCH better! Thanks!
This is really helpful. What slope do you recommend for the Abbey Road filters? 12db? 18db?
12dB.
thank you very much, these eq curves will help me a huge amount, much appreciated
Thank You Bobby!
Always learning stuff from your books, posts, etc.
I was just HPFiltering conservatively in the 50-100Hz range, but you made me realize that I can go way up and save that precious low end bandwidth.
I bow with respect. Cheers! :)
Thanks a lot!
Please is there any chance for a printable page?
Luke Sega ( Germany)
Hi Bobby
Just came across your post. Im new to mixing. On an EQ that doesnt have hpf or lpf, how much should we shelf at 200 and 10k? It looks like you did -3db? Many thanks
Thanks for the tips!
Post a Comment