Get This Free Cheat Sheet Guaranteed To Help Your Next Mix

Showing posts with label ambience. Show all posts

Tuesday, January 21, 2014

The Different Types Of Reverb

Reverb. It's use goes through cycles from a lot to almost none, but you'll usually find at least some reverb-type ambience used in every mix. The problem is that you can't really tell much of a distinction between the different types of some inexpensive plugins or boxes. In case you're a little fuzzy about the differences between the types of reverb available, here's a little refresher excerpt from The Mixing Engineer's Handbook 3rd edition.

"There are five primary categories of reverb, all with a different sonic character; three of these are actual acoustic spaces, one is an analog way to reproduce one, and one is not found in nature but can really sound cool. The reason why there’s a difference is that just like everything else in music and audio, there are many paths to the same end result. You’ll find that every digital reverb plugin or hardware unit provides its own version of these sounds.

Hall: A hall is a large space that has a long decay time and lots of reflections. Sometimes there’s a subcategory of the hall reverb called “church,” which is just a more reflective hall with a longer decay.

Room: A room is a much smaller space that can be dead or reflective, depending upon the material that the walls, floor and ceiling are made of. It usually has a short decay time of about 1.5 seconds or less.
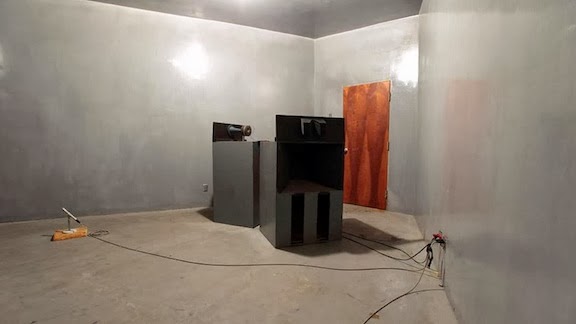
Acoustic Chamber image from Bobby Owsinski's Big Picture production blog
Figure 1: An Acoustic Chamber
Chamber: An acoustic chamber is a dedicated tiled room that many large studios used to build in order to create reverb (see Figure 1). Phil Spector’s “Wall of Sound” was built around an excellent acoustic chamber at Gold Star Studios in Hollywood (long since closed unfortunately), for example. The acoustic chambers at Capitol Studios, designed by Les Paul himself, still have a reverb sound that is revered by mixers everywhere. Other common artificial spaces used as acoustic chambers include showers and stairwells.
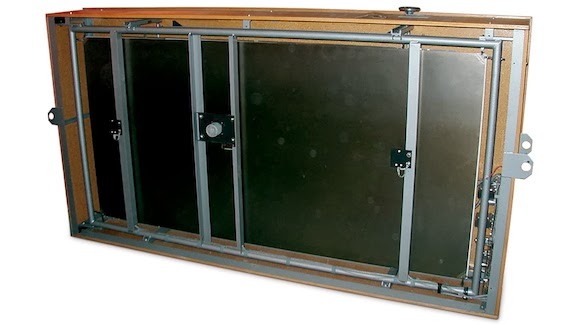


Plater reverb image from Bobby Owsinski's Big Picture production blog
Figure 2: A Plate Reverb

Plate: A plate is a 4 foot by 6 foot hanging piece of sheet metal with transducers attached to it that many studios used for artificial reverb when they couldn’t afford to build a chamber (see Figure 2). The first plate reverb was the EMT 140, developed in the late 1950s, and is still held in high esteem by many mixers for its smooth sound.
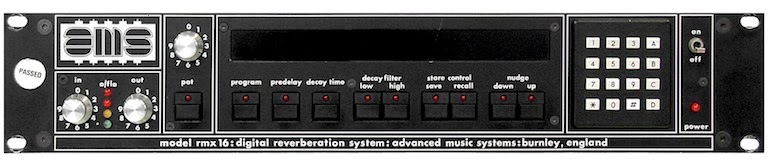


AMS RMX 16 Digital Reverb image from Bobby Owsinski's Big Picture production blog
Figure 3: The AMS RMX 16 Digital Reverb
Non-Linear: The non-linear category is strictly a product of modern digital reverbs as the sound isn’t found anywhere in nature. While natural reverbs decay in a rather smooth manner, once a reverb is created digitally, it’s possible to make that decay happen in unusual ways. The reverb tail can be reversed so it builds instead of decays, or it can be made to decay abruptly, both of which makes the decay “non-linear.” This preset was a popular mixing effect used on drums during the 80’s when the feature first became available on the AMS RMX 16 digital reverb (see Figure 3).

As to which reverb category to use, that’s strictly up to the taste of the mixer and how he sees it fitting with the song. Many mixers might always use a room or a chamber on drums, a plate on vocals or guitars, and a hall on strings or keyboards, while others may do just the opposite. Many might refine the sounds of each and finally settle on a few that they feel always work in a particular situation with a certain instrument or vocal. It’s all up to experience.

All of these reverbs can be modeled using what’s known as a “convolution reverb” that uses an quick burst of audio energy (called an impulse) to excite the room or device, which then allows it to sample its parameters. Examples of convolution reverbs include the Audio Ease Altiverb and Avid’s TL Space."

----------------------------------

You should follow me on Twitter and Facebook for daily news and updates on production and the music business.

Don't forget to check out my Music 3.0 blog for tips and tricks on navigating social media and the new music business.

Sunday, June 17, 2012

How To EQ Effects

One of the things that many young mixers struggle with is getting reverb and delay effects to blend well in the mix. This happens more with reverbs than delays, especially during those times when the reverb just never seems quite right. Usually the way the problem is addressed is to audition presets until you find something that seems to fit better, but that can take a lot of time and you can end up chasing you're tail very easily where you're never sure which one is the best. What many engineers seem to forget is that most of those presets are the same basic reverb with different EQ settings, which you can add yourself to get there faster.

One of the things that would happen regularly back in the early days of artificial reverb (especially when plates came along but way before digital reverbs) is that one of the ways to tune a reverb was to add an EQ on the send before the actual reverb itself. Usually the EQ was set more to cut than to boost (although you'd boost it if you wanted a bright sounding plate), but if done well, the reverb would suddenly fit a lot better in the track. In fact, back in the classic days of the big studios, this was done in the back room and not left up to the engineer at the console, and it became one of the reasons for clients wanting to work there. They loved the sound of their reverbs.

We can use those same techniques today using reverb plugins on our DAW. Just remember that it usually sounds best if the EQ is placed before the reverb, not after it. Here are 3 EQ curves that I use all the time.

Vocal Reverb EQ image from Bobby Owsinski's Big Picture production blog
Vocal Reverb
One of the things about reverb is any low end just muddies up the track, and high end may stick out too much, that's why we want to roll each end of the frequency spectrum off a bit, in this case at 200Hz and 10kHz. When we're using reverb on vocals, sometimes it fits a lot better if there's also a bit of an EQ scoop in the mid-range around 2kHz where the consonants of the vocal live. It looks like the curve on the left.


Instrument Reverb EQ image from Bobby Owsinski's Big Picture production blog
Instrument Reverb
For instruments, I like the Abbey Road curve, which is what they've used on their reverbs since the 60's. This means that the low end is rolled off at 600Hz and the high end at 10kHz. This curve makes any reverb sound a lot smoother and fit better with the track. You'll find that by adding more reverb, you just increase the depth without it sounding washed out. Off course, too much of a good thing is no good either, so be judicious with the amount you add.


Drum Reverb EQ image from Bobby Owsinski's Big Picture production blog
Drum Reverb
Sometimes reverb on the drums is the toughest of all in that you want depth without calling attention to the ambience. A good way to do that is a variation of the Abbey Road curve where the high end is severely rolled off to 6k, 4k, or ever 2kHz! You'll find that you'll have some depth without the ambience ever calling attention to itself.

While these EQ curves work great with reverbs, don't be afraid to try them with delays as the results are very similar. You'll get depth without hearing much of the delay itself. Of course, if you want to really hear the reverb or delay, go the opposite way and increase the high end and the effect will jump right out of the track.

There are a lot more tips and tricks like this in The Mixing Engineer's Handbook, and you can read some excerpts on my website.

----------------------------------

You should follow me on Twitter for daily news and updates on production and the music business.

Don't forget to check out my Music 3.0 blog for tips and tricks on navigating social media and the new music business.

Monday, April 2, 2012

De-Reverberation Made Easy

Zynaptiq Unveil graphic from Bobby Owsinski's Big Picture production blog
One of the dreams of post engineers has been to find a device or plugin that allows you to strip the reverberation from a sound. Dialog or effects recording with unwanted ambience eventually have to be replaced, costing time and money, and a music track swimming in too much reverb can turn into a muddy mess. Now comes an announcement from a company called Zynaptiq regarding a Mac plugin called UNVEIL, which they say accomplishes real-time de-reverberation and "signal focusing."

By using artificial intelligence, UNVIEL claims to be able to not only strip the ambience from a sound, but to add more of the natural ambience back into the sound, as well as attenuating some of the components that cause a sound to be "muddy" or masked.

I've not yet played with UNVIEL, but if it works as claimed, it could immediately find a place in the plugin lists of DAWs everywhere. Not only would it be invaluable for post, but during a mix as well. Instead of adding artificial reverb to a mix element, it would be great just to be able to adjust the natural ambience of the element itself. That means, of course, that you have to record the sound well complete with some natural ambience in the first place, but that's a topic for a different discussion.

Check out UNVIEL at the Zynaptiq site. It's just $259USD and a free trial is available. Let me know if it works as claimed.

----------------------------------

You should follow me on Twitter for daily news and updates on production and the music business.

Don't forget to check out my Music 3.0 blog for tips and tricks on navigating social media and the new music business.

LinkWithin

Related Posts Plugin for WordPress, Blogger...