Get This Free Cheat Sheet Guaranteed To Help Your Next Mix

Showing posts with label Recording Engineers Handbook. Show all posts

Wednesday, April 13, 2016

So You Want To Buy A Cheap Microphone

real vs fake U87 image
Can you spot the fake?
I've received a lot of questions lately about my opinion on some very inexpensive vintage mic clones. I love finding a great cheap mic as much as the next guy, but there are some things to watch out for before buying. I thought it might be helpful to repost the following from 3 or 4 years ago.

In many ways we're in the golden age of audio gear. On the whole, inexpensive audio gear (under $500) sounds better than ever and is a much better value than even a decade ago and way better than 20 years ago. The same can be said for mics, as there is a large variety of cheap mics that provide much higher performance for the price than we could have imagined back in the 70s and 80s.

That said, there are some pitfalls to be aware of before you buy. Here's an excerpt from The Recording Engineer's Handbook 3rd edition that covers the potential downside of inexpensive mics.

"One of the more interesting recent developments in microphones is the availability of some extremely inexpensive condenser and ribbon microphones in the sub-$500 category (in some cases even less than $100). While you’ll never confuse these with a vintage U 47 or C 12, they do sometimes provide an astonishing level of performance at a price point that we could only dream about a few short years ago. That said, there are some things to be aware of before you make that purchase.

Quality Control’s The Thing
Mics in this category have the same thing in common; they’re either entirely made or all their parts are made in China, and to some degree, mostly in the same factory. Some are made to the specifications of the importer (and therefore cost more) and some are just plain off-the-shelf. Regardless of how they’re made and to what spec, the biggest issue from that point is how much quality control (or QC, also sometimes known as quality assurance) is involved before the product finds its way into your studio.

Some mics are completely manufactured at the factory and receive a quick QC just to make sure they’re working and these are the least expensive mics available. Others receive another level of QC to get them within a rather wide quality tolerance level, so they cost a little more. Others are QC’d locally by the distributor with only the best ones offered for sale, and these cost still more. Finally, some mics have only their parts manufactured in China, with final assembly and QC done locally, and of course, these have the highest price in the category.

You Can Never Be Sure Of The Sound
One of the byproducts of the rather loose tolerances due to the different levels of QC is the fact that the sound can vary greatly between mics of the same model and manufacturer. The more QC (and high the resulting price), the less difference you’ll find, but you still might have to go through a number of them to find one with some magic. This doesn’t happen with the more traditional name brands that cost a lot more, but what you’re buying (besides better components in most cases) is a high assurance that your mic is going to sound as good as any other of the same model from that manufacturer. In other words, the differences between mics are generally a lot smaller as the price rises.

The Weakness
There are two points that contribute to a mic sounding good or bad, and that’s the capsule and the electronics (this can be said of all mics, really). The tighter the tolerances and better QC on the capsule, the better the mic will sound and the closer each mic will sound to another of the same model.

The electronics is another point entirely in that a bad design can cause distortion at high SPL levels and limit the frequency response, or simply change the sound enough to make it less than desirable. The component tolerances these days are a lot closer than in the past, so that doesn’t enter into the equation as much when it comes to having a bearing on the sound. In some cases, you can have what could be a inexpensive great mic that’s limited by poorly designed electronics. You can find articles all over the Web on how to modify many of these mics, some that make more of a difference to the final sound than others. If you choose to try doing a mod on a mic yourself, be sure that your soldering chops are really good since there’s generally so little space that a small mistake can render your mic useless."

You can read additional excerpts from The Recording Engineer's Handbook or my other books on the excerpts section of bobbyowsinski.com.


Wednesday, October 14, 2015

The Reasoning Behind The Hanging Microphone

The Hanging Microphone image
Here's an excerpt from my Recording Engineer's Handbook that explains why those old vintage tube mics are frequently seen hanging upside down.

"Everyone has seen the photos of the vintage large diaphragm tube mic hanging upside down in front of the vocalist. Many engineers think that it’s a fashion statement or some sort of convenience, but there really are several good reasons for placing a mic this way. Here are just a few things to consider;
  • Much of the reason for hanging a mic upside down is because many of the early studio microphones used tube electronics. The heat rising from the tube can cause the diaphragm to change temperature over time, which will change the sound of the mic. Placing the tube above the capsule will let the heat rise without passing over the diaphragm.
  • An excellent byproduct of singing slightly upward into a mic because it’s positioned upside down is that it forces the singer’s airway open and encourages a full body voice. Take a deep breath and sing a low note. Start with your chin to your chest and slowly lift your head until your chin is about 15 degrees above level. Hear any difference?
  • Maybe even more important, the mic can be positioned so the singer is less likely to direct popping air blasts into the mic
  • It’s easier for the singer to read any music or lyrics since the mic is out of the way.
Now you can see that hanging the microphone was more than a random design. It was indeed a well thought out placement technique used by our engineering forefathers."


Wednesday, August 12, 2015

A Basic Tracks Session Checklist

Basic Tracks Checklist image
There are more and more small recording studios than ever before, but many of the owners don't yet have the experience of doing a session beyond their own bands. Here's some help in prepping for that first outside session that I took from the latest 3rd edition of The Recording Engineer's Handbook

Before you can prepare for the recording you need some essential information first. Here’s a list of the minimum that you must determine in advance of the session.

This will usually be provided by the producer, artist or band leader, and assumes that you’re unfamiliar with the act. Here’s what to ask:
  • What type of music will be recorded?
  • How much recording time to do you think you’ll need?
  • How many songs do you expect to record?
  • Who are the musicians (If you know some of them it might affect your setup)?
  • Who’s the producer (if you’re not talking to him already)?
  • What time does the session begin? Does that mean the downbeat of recording or when the musicians are expected at the studio to load in?
  • How long do you expect the session or sessions to go?
  • How many musicians will be playing at once?
  • What’s the instrumentation?
  • How large is the drummer’s kit? How many toms will he be using?
  • Will the guitarist(s) be using an acoustic or electric? 
  • What kind of amps will the guitar player(s) and bass player be using?
  • Do any of the players expect to use house gear like drums, guitar amps, or keyboards?
  • How many cue mixes will be required?
  • Will there be a scratch vocal tracked at the same time?
  • Will they bring any special outboard gear or mics that they’d like to use?
  • Will they be tracking to a click or loops?
  • Do they require any particular instruments, amps or effects?
Determining the above before the musicians arrive at the studio can go a long way to achieving a quick and easy setup and an efficient session. 

TIP: Don’t ask for the setup information too far in advance since much can change by the day of the session. Getting the info the day before the session is usually sufficient.

Thursday, July 2, 2015

Andy Johns On Recording And Mixing

Andy Johns image
Here's a great video of the late Andy Johns (Glynn Johns' younger brother) giving his tips and tricks on everything from recording to mixing, including how he got the famous drum sound on Led Zeppelin's "When The Levee Breaks."

In the video Andy refers to getting some tricks that he uses from my Recording Engineer's Handbook, in which he has a rare featured interview. Of course, Andy's credits read like a who's who of rock, including Led Zeppelin, The Rolling Stones, Van Halen, Free, Rod Stewart, Eric Clapton and many more.


Wednesday, June 3, 2015

8 Things To Check Before You Hit The Record Button

Frances Densmore recording Mountain Chief imageHere's an excerpt from my Recording Engineer's Handbook 3rd edition that's a checklist of questions to ask yourself before you ever hit the Record button.

"1. Does the instrument sound great acoustically? Make sure that you start with a great acoustic sound with the instrument well tuned and minimum of sympathetic vibrations and extraneous noises.

2. Are the mics acoustically in phase? Observe the 3:1 rule and make sure that any underneath mics are at a 90° angle to the top mics.

3. Are the mics electronically in phase? Make sure that all the mic cables are wired the same by doing a phase check.

4. Are the mics the correct distance from the instrument? If they’re too far away they’ll pick up too much of the room or other instruments. If they’re too close the sound will be unbalanced with either too much attack or ring, and not enough of the body of the instrument. Walk around the player, put your finger in your ear, and find the spot that sounds the best. Remember, most instruments need some space for the sound to develop. The ambience from the surrounding area is a big part of the sound for most instruments.

5. Does it sound the same in the control room as when you’re standing in front of the instrument? This is your reference point and what you should be trying to match. You can embellish the sound after you’ve got the sound as close to the way it was when you were standing next to the player.

6. Is there another problem besides the mic placement? A great sound is dependent upon the instrument, the player, the amp (if there is on) and the room. The player has to be able to achieve the tone you're trying to record with his hands or mouth or voice first and foremost. The mic itself usually has less to do with the ultimate sound than the placement, room and the player and ultimately, the project itself.

You should always trust your ears and begin by listening to the musician in your studio, find a sweet spot and then begin your microphone placement there. If you don’t like the resultant sound, then move the mic or swap it with another. EQ is the last thing you should touch.

7. Is the problem in your signal chain? Don’t neglect your microphone preamp. The better your preamp, the less trouble you’ll have capturing the sound, but sometimes a certain mic/preamp combination will give you the sound you need. Don't be afraid to experiment.

8. Is the problem in the players signal chain? A guitarist’s signal chain, for example, can be a huge help or a big hindrance. You’ll get a warmer yet aggressive guitar sound by decreasing the amount of distortion from pedals, but turning up the amp’s volume instead to obtain the sustain/distortion from the amp and speaker. Also, smaller amps and speakers tend to sound bigger than large amps/speakers when recording.

REMEMBER: Mics cannot effectively be placed by sight, which is a mistake that is all too easy to make. The best mic position cannot be predicted, it must be found."


Wednesday, May 27, 2015

4 Tips For A Great Headphone Mix

headphones on console image
Most musicians perform better with a great mix and headphones that work perfectly. Here's an excerpt from The Recording Engineer's Handbook 3rd edition that provides 4 tips for getting those headphones session-ready.

"Perhaps the greatest detriment to a session running smoothly is the inability for players to hear themselves comfortably in the headphones. This is one of the reasons that veteran engineers spend so much time and attention to the cue mix and the phones themselves. In fact, a sure sign of an inexperienced engineer is treating the headphones and cue mix as an afterthought instead of spending as much time as required to make them sound great.

While it’s true that a veteran studio player can shrug off a bad or distorted phone mix and still deliver a fine performance, good “cans” makes a session go faster and easier, and takes a variable that can sometimes be the biggest detriment to a session out of the equation.
1. Long before the session begins, test every headphone to make sure there’s no distortion and they’re working correctly (test with actual music). 
2. Make sure that there’s plenty of cable available so that the musicians can move around as needed. Use cable extenders as necessary. 
3. Check to make sure that the cables are not intermittent (nothing stops a session as fast as a crackling phone). 
4. Some engineers send the stereo monitor mix (the mix that you’re listening to in the control room) to the phones first, then add a little of the individual instruments as needed (“more me”). This is a lot easier than building up individual mixes, unless that’s what the musicians request.
Where at one time each studio had to jury-rigged together their own headphone amp to power their cue mixes, these days its easy and fairly inexpensive to buy a dedicated headphone amplifier from any number of manufacturers that’s easy to set up and sounds great.

Companies like Behringer, Furman, PreSonus, Rolls and Aphex all make units that will work better and can be a lot cheaper than the traditional method of a large power amp and resistors."

To read additional excerpts from The Recording Engineer's Handbook and my other books, go to the excerpts section of bobbyowsinski.com.

Wednesday, May 6, 2015

The 8 Constants Of Vocal Recording

By my count, there are 8 “constants” that we find in vocal recording. These are items or situations that almost always prove to be true. Just keeping them in mind can save you a lot of trouble in the search for a sound that works for you and your vocalist.

Here are a few tips taken from The Recording Engineer’s Handbook and the Music Producer’s Handbook to help you get a great vocal sound quickly and easily without any of those nasty side effects.

1) Your mic selection, amount of EQ, and compression used is totally dependent on the voice you are recording. Setting up the same signal chain for everyone might work sometime, but best to keep an open mind (and ears) before you settle on a combination.

2) The best mic in the house doesn’t necessarily get the best vocal sounds. There is no one microphone that works well on everything, especially a instrument as quirky as the human voice.

3) A singer who is experienced at recording knows which consonants are tough to record and knows how to balance the them against the vowels to get a good final result. A singer with this kind of experience will make you look like a genius.

4) With a good singer, many times you'll get “the sound" automatically just by putting him/her in front of the right microphone. On the other hand, with a bad singer (or even a good singer that just doesn't adjust well to the studio), no amount of high priced microphones or processing may be able to get you where you need to go.

5) In general, vocals sound better when recorded in a tighter space, but not too tight. Low ceiling rooms can also be a problem with loud singers as they tend to ring at certain lower mid range frequencies, which might be difficult to eliminate later.

6) Windscreens are actually of little use when recording a vocalist with bad technique. There are two different sorts of people in this category: the people who have never sung with sound reinforcement, and the people who have developed bad habits from using a mic on stage.

7) Decoupling the stand from the floor as well as the microphone from the stand will help eliminate unwanted rumbles. Often times a microphone isolation mount isn't enough. Place the stand on a couple of mouse pads or a rug for a cheap but efficient solution.

8) Just marking the floor with tape might get the vocalist to stand in the right position in front of the mic, but she can easily move her head out of position. An easy way to have a vocalist gauge the distance is by hand lengths. An open hand is approximately eight inches while a fist is about four inches. By saying, “Stay a hand away,” the vocalist can easily judge his distance and usually doesn’t forget (see the graphic on the side).


Wednesday, February 25, 2015

Tips For Recording An Audience

Concert Audience image
If you're recording a live performance, then you want to pick up some of the audience to make it sound realistic. Here are some techniques and considerations culled from the latest edition of my Recording Engineer's Handbook.

"Audience recording is both the key and the problem with live recording. It’s sometimes difficult to record the audience in a way that captures its true sound. The transient peaks of the audience makes it not only difficult to capture well, but to isolate from the stage mics as well.

Considerations
  • Miking the audience lends itself to using omnidirectional mics, but shotgun mics can be especially useful because they help attenuate the intimate conversations from the crowd that happen around where the mic is placed. In the event you have neither type of microphone, just make sure that the mics that you use are identical models and don’t forget to engage the low-frequency rolloff switch if the mic has one.
  • Mic placement outdoors is a lot more difficult because you have nothing to hang microphones from to get enough distance over the audience. For another thing, you don’t have the ambience of the venue to help you out so you usually have to resort to more microphones as a result. Don’t forget the windscreens, because nothing makes a track unusable like wind blasting across the mic’s capsule.
  • Many engineers are tempted to use stereo recording techniques such as spaced pairs, X/Y, ORTF and Blumlien, but these can actually return some poor results when it comes to audience miking. What these setups do is capture the ambience of the environment and a perfect stereo picture, but your primary concern is just to capture the audience. They’re two different beasts and have to be handled that way.
  • It’s very easy to have audience microphones overload either from the stage volume of band or the peaks of the audience response. Therefore, it’s a good idea to heavily compress or limit them to prevent overload.
Placement
Technique #1: Place a pair of identical mics at about the half-way point between the edge of the stage and the back wall of the venue. Make sure that the mics are placed at least three feet above the audience. Start with the microphones facing directly at one another across the audience as in Figure 9.1, then aim them both down towards, but not exactly at, the middle of the audience.

Please Note: The higher you get the mics over the audience the better, but if you’re in a club with a low ceiling in a club, you’re better off with placement closer to the audience since the reflections from the ceiling can sometimes sound pretty bad.

Figure 9.1: Simple audience miking technique
Audience Miking Technique #1 image
  • Variation: If you only need a mono audience track, splay the mics off-access as in Figure 9.2. This configuration can result in a fuller sound in mono, but will result in a stereo track that’s off balance since one mic is pointed closer towards the stage and the main sound system than the other.
Figure 9.2: Simple audience miking technique variation for mono
Audience Miking Technique #1 variation

Technique #2: In a club, hang a couple of mics at about the middle of the venue pointing directly down from the ceiling. This is where omnidirectional mics come in handy. Be sure to hang each mic the same distance from the stage as the other if you want a balanced stereo image."

There are a number of other techniques for recording the audience that can be found in the book.


Don't forget to check out my Music 3.0 blog for tips and tricks on navigating social media and the new music business.

Wednesday, February 11, 2015

Drum Tuning For Engineers

Criss-cross drum tuning image
There's no doubt that getting a drum sound is the number one priority for any recording that has a drummer. Sometimes you luck out and the drums sound great by just putting the mics up, but other times they require some care in order to make them sound the way you want.

The first best thing that can be done is to change the heads, but the drum still has to be tuned, and many times the drummer isn't that much better than the engineer when it comes to making those babies sing.

Here's an excerpt from my Recording Engineer's Handbook 3rd edition that describes the best method for tuning the drums.

"Unless you’re already a drummer, you probably aren’t aware of the proper way to tune a drum. The process is actually quite simple, but does take some time and experimentation. The idea is to make sure that all of the tension rods that hold the head on have the same tension at each lug. What you want is for the pitch to sound the same at each lug as you tap near it. Here’s how it’s done:
  1. Hit the head an inch in front of each lug of the drum. Is the sound the same at each lug? 
  2. Using a drum key, adjust the tension so that the sound is the same at each lug. Is the sound the same at each lug now?
  3. When the pitch (the tension) is the same at each lug, then when hit the drum in the center. It should have a nice even decay.  
  4. Using the same technique, tune the the bottom head to the same pitch as the top head. What does the drum sound like now when you hit it in the center? Is the tone even? Is the decay even? Are there any overtones?
TIP: For faster and more even tuning, adjust the lugs in a criss-cross pattern as shown on the left.


Tuning Between the Top and Bottom Head
 There are three ways to tune drums that use a top and bottom head: 
  • The top and bottom heads are tuned to the same pitch. This provides the purest tone and longest sustain.
  • The bottom head is tuned lower than the top. This provides a deep sound with a lot of sustain as well as a pitch drop or "growl." 
  • The bottom is tuned higher (tighter) than the top. This also produces a pitch drop  sound, although it’s a bit shallower and has a shorter sustain. 

When the drum is first tuned, both heads are tuned to the same pitch. After the correct pitch for the top head is selected, tune the bottom head anywhere from a third to a fifth away from the top head if that’s the sound you’re looking for."

Tuesday, December 16, 2014

Ed Cherney On Recording The Rolling Stones

Ed Cherney imageOne of the most versatile and talented engineers of our time, Ed Cherney has recorded and mixed projects for The Rolling Stones, Iggy Pop, Bob Dylan, Was, Michael Jackson, Elton John, Bob Seger, Roy Orbison, and John Mayer as well as many others. Ed has also recorded and mixed the multiple Grammy-winning Nick of Time and Luck of the Draw CD's for Bonnie Raitt as well as engineered the Grammy-winning "Tears in Heaven" track for the Eric Clapton scored film, Rush.

Here's an excerpt from the interview that appears in my Recording Engineer's Handbook where Ed talks about his time recording The Stones.

"When you’re tracking, do you go just for a good drum track or do you try to get as much as you can?
I try to get as much as I can. I think it’s musically a lot better that way. Also, I don’t isolate a lot of instruments that much any more. I did the Rolling Stones and the amps were in the room with just a little bit of baffling, but basically open so that they could hear them. Everything was leaking into everything, but that just gave it that glue, especially when it was played well.  

So leakage doesn’t bother you?
It depends on the band and what you’re trying to do. If you know that everything is going to be swinging with the drums, then you’re going to try to get it. Otherwise, you’re just laying down a template so you have to isolate things as good as you can if you know you’re going to be layering guitars and that kind of stuff.  

What are you using on guitar amps?
Like pretty much everybody else, I’ve used 57’s forever, but lately I’ve been using Royer R-121’s. I’ve been liking those and the musicians I’ve been working with have been liking them too. It’s pretty much just put the fader up and they capture what’s going on with the amp. They’ve got a very sweet character.

Do you only use one mic on the cabinet?

Usually, unless it’s in stereo. Sometimes I’ll use a 414 or a large diaphragm condenser back off the cabinet if we want the room sound, but typically I’ve been putting up a 121 in front of the cabinet.

Do you take bass direct or do you use an amp as well?
Again it depends, but I try to do both. If you don’t have a lot of space and you don’t have any isolation, I’ll go with a direct, depending on the player, but usually I’ll go with both with a FET 47, or something like that on the cabinet, and a DI  I like using the Groove Tube DI, but then again it depends. If it’s an active bass, then you might want to use a DI with transformer in front of it.  

Do you EQ when you record?
Heck yeah, but dipping more than anything. If something is a little dark, then it might be because 200 or 300 is building up, so you dip a little of that out and maybe add a little top. If you’re going to tape, then you might want to add a little top anyway. If you’re going to Pro Tools, then you might want to dip a little 2, 3, 4K to take the edge off it.

Was it any different recording the Stones from anyone else?
It’s a rock gig, but there’s five guys there that have been around and know what they want to hear. You’re really not allowed to screw up. Some younger guys might let you get away with something, but you’ve got to be on top of your game more so than with anyone else.

How did you approach Charlie’s drums?
It’s just a straight-ahead rock kit. The less you do the better off you are. You put some mics up and try to capture the drum kit like it’s one instrument rather than separate drums. You just get out in the room, have a listen and try to recreate that but there’s not a lot of work involved. The work is in the perception and not in the knob twisting.

How did you determine where to place everyone in the room?
I think I sat there for a day and half before I did it. I’d go out and sing a song, clap my hands and stomp around and try to create a space where everyone can see each other. I tried to get some things off-axis yet keep the room kind of open and live so people weren’t just relying on their headphones and could hear their amps and have that interplay. I tried to make sure that the line of sight was intimate, yet keep some separation. Also, I’ll ask the assistant where they usually set everything up (laughs).

Do you have a philosophy of recording?
I want to get the sounds to tape as quickly as possible, then play it back so you can talk about it. It’s real at that point. “That’s too bright. That’s too dull. That should be louder.  That should be a different part. That should be a different snare drum.” It’s easy to modify once you can hear it. I’ve been in places where you dick around a lot before you play any music and the session doesn’t move forward. You just can’t make music that way."

Tuesday, December 9, 2014

Al Schmitt's Mic Setup

Al Schmitt image
After 18 Grammy’s for Best Engineering (more than any other engineer) and work on over 150 gold and platinum records, Al Schmitt needs no introduction to anyone even remotely familiar with the recording industry. Indeed, his credit list is way too long to print here (but Henry Mancini, Steely Dan, George Benson, Toto, Natalie Cole, Quincy Jones, and Diana Krall are some of them), but suffice it to say that Al’s name is synonymous with the highest art that recording has to offer. Here's an excerpt from my Recording Engineer's Handbook that covers his usual mic setup.

Do you use the same setup every time?
I usually start out with the same microphones. For instance, I know that I’m going to immediately start with a tube U 47 about 18 inches from the F-hole on an upright bass. That’s basic for me and I’ve been doing that for years. I might move it up a little so it picks up a little of the finger noise. Now if I have a problem with a guy’s instrument where it doesn’t respond well to that mic then I’ll change it, but that happens so seldom. Every once in a while I’ll take another microphone and place it up higher on the fingerboard to pick up a little more of the fingering. 

The same with the drums. There are times where I might change a snare mic or kick mic, but normally I use a D-112 or a 47 FET on the kick and a 451 or 452 on the snare and they seem to work for me. I’ll use a Shure SM57 on the snare underneath and I’ll put that microphone out of phase. I also mic the toms with 414’s, usually with the pad in, and the hat with a Schoeps or a B&K or even a 451.

What are you using for overhead mics?
I do vary that. It depends on the drummer and the sound of the cymbals, but I’ve been using M 149’s, the Royer 121’s, or 451’s. I put them a little higher than the drummer’s head.

Do you try to capture the whole kit or just the cymbals?
I try to set it up so I’m capturing a lot of the kit, which makes it a little bigger sounding overall because you’re getting some ambience.  

What determines your mike selection?
It’s usually the sound of the kit. I’ll start out with the mics that I normally use and just go from there. If it’s a jazz date then I might use the Royers and if it’s more of a rock date then I’ll use something else.

How much experimentation do you do?
Very little now. Usually I have a drum sound in 15 minutes so I don’t have to do a lot. When you’re working with the best guys in the world, their drums are usually tuned exactly the way they want and they sound great, so all you have to do is capture that sound. It’s really pretty easy. And I work at the best studios where they have the best consoles and great microphones, so that helps.  

I don’t use any EQ when I record. I use the mics for EQ. I don’t even use any compression. The only time I might use a little bit of compression is maybe on the kick, but for most jazz dates I don’t.

How about mic preamps? Do you know what you’re going to use? Do you experiment at all?
I know pretty much what I’m going to use. I have a rack of Neves that I’ll use on the drums.

How do you handle leakage? Do you worry about it?
No, I don’t. Actually leakage is one of your best friends because that’s what makes things sometimes sound so much bigger. The only time leakage is a problem is if you’re using a lot of crap mics. If you get a lot of leakage into them, it’s going to sound like crap leakage, but if you’re using some really good microphones and you’re get some leakage, it’s usually good because it makes things sound bigger.

I try to set everybody, especially in the rhythm section, as close together as possible. I come from the school when I first started where there were no headphones. Everybody had to hear one another in the room, so I still set up everybody up that way. Even though I’ll isolate the drums, everybody will be so close that they can almost touch one another."

----------------------------------

Tuesday, December 2, 2014

An Interview With The Great Eddie Kramer


Unquestionably, one of the most renowned and well-respected producer/engineers in all of rock history, Eddie Kramer’s credits list is indeed staggering. From rock icons such as Jimi Hendrix, The Beatles, The Rolling Stones, Led Zeppelin, Kiss, Traffic and The Kinks, to pop stars Sammy Davis Jr. and Petula Clark, as well as the seminal rock movie Woodstock, Eddie is clearly responsible for recording some of the most enjoyable and influential music ever made. Here's an excerpt from the interview section of the The Recording Engineer's Handbook where he talks about his setups, technique and even a little Jimi Hendrix.

"When you started you were pretty limited by the number of tracks and channels available.
Definitely. You have to use your imagination and think really hard about how to plan it out. For instance, on Hendrix’s stuff, which is the classic example, it was done on four track. On Are You Experienced we used mono drums and mono guitars and so forth. We would fill a four track up then dump it down to another four track, leaving two tracks open, then you may have to do that again. On Axis: Bold As Love, I was recording stereo drums which made a big difference.  

Was your approach different when you went to stereo?
Yes. When it was mono I just used a single overhead, a snare mic and bass drum mic. There might be one or two tom mics but that would be it. When I went to stereo I probably used a pair of 251’s or 67’s, I can’t remember which. I was just trying to get that left to right image when the toms would go left to right. I always record from the drummers perspective and not from the listeners perspective.  

Has your approach to tracking changed when you do it today?
Yes, it has been modified in the sense that you don’t have to use an enormous room to record the drums anymore. In fact, bands today don’t want that huge reverberant drum sound that we used to love, so you can record drums in a smaller deader space and still get a big fat sound. Obviously I’m using more mics, multiple mics on the bass drum, multiple mics (top and bottom) on the snare, which I didn’t do before. I use a lot of mics on the guitar and then pick the ones that I like.

Is your setup the same all the time?
Pretty much. I will experiment with different microphones as they come in. The [Shure] KSM-27 is a great guitar amp mic. I love the new KSM141, which is a cross between a 451 and a KM84, on hat, percussion, acoustic guitar and underneath the snare. The SM91 and SM 52 are my bass drum mics of choice, and I use KSM44 on overheads, but I still use vintage mics like 47’s, and the new Neumann TLM 103’s, 147’s and 149’s. To me a microphone is like a color that a painter selects from his palette. You pick the colors that you want to use, so the mics are my palette. In the end it doesn’t matter to me too much. Whatever is available, I’ll just look at it and think, “I wonder what this will sound like on the guitar, or bass or whatever instrument.” I know what my standard stuff is and if I need to do something really fast I’ll always go back it, but I’ll often experiment with whatever happens to be in the studio.  

Do you tailor the mic preamp to the microphone? Do you have certain combinations that you like?
No, just blanket it with vintage Neve modules, either 1033’s or 1081’s. I like the 1081’s because of the four band EQ so I can carve things out particularly when I’m recording bass drum. Lately I’ve been using the new Vintech X81, which is a copy of the 1081.

So you’re EQing during recording?
I always do. I have done so my whole life. If I hear a sound that I like then it immediately goes to tape. If it’s a guitar, then I’ll print the reverb as well on a separate track so the sound is there and locked in. I usually have an idea of what it’s going to sound like in the final analysis so the EQ and compression is done right then and there. I think if you bugger around with it afterwards you have too many choices. This isn’t rocket science, it’s music. Just record the thing the way you hear it! After all, it is the song that we’re trying to get and the guy’s emotion. We’re becoming so anal and self-analytical and protracted with our views on recording, I think it’s destructive and anti-creative. It’s bad enough that we have to be locked into a bloody room with sweaty musician (laughs).  

Recording music should be a fun filled day. To me, making a record should be about having a ball because it makes the day go quickly and yet you’re still getting what you want on tape. There’s a friend of mine that has a bar in his studio and after the session is finished everybody has a beer and relaxes. What a wonderful thing! I think artists today have a tendency not to do this. You cut to a bloody click track, go to Beat Detective, do a lot of overdubs in Pro Tools, and then spend a lot of time searching for the right plugins to make it sound cool. 

But the track has to move and breathe. Listen to all the great songs and albums that have been recorded the last 30 years. The ones that really stand out are the ones that breathe and move. With human beings, their tempo varies. I do admire what can be done in Pro Tools, but if there’s something that wrong, you should have done another take and maybe chop things together.

What’s the hardest thing for you to record?
The toughest thing to record is a full orchestra. Getting the right room and properly placing the microphones is really tough, but it’s also so rewarding. The other thing that’s tough is the artist that can’t get the right feel so you have to go through a lot, changing microphones and instruments and placement, to make it work. That can be boring.

I like to think that going into the studio is a challenge. What usually happens is that the artist, unbeknownst to himself, has done a brilliant job on the first take and it all goes down-hill very rapidly after that. The reverse can also be true in that the first take is weak because the person is just getting used to it and they build up gradually to point where it “is” great.

Didn’t you tell me once that “All Along The Watchtower” was take #27?
That’s a great example of an artist of Jimi’s stature starting from square one with a very difficult arrangement. He’s yelling at Mitch [Mitchell, drummer for the Experience], “C’mon. Here’s how you do the rhythm part,” then Mitch eventually gets it. Then he yells at Dave Mason because he can’t get the secondary rhythm guitar part. Eventually he gets it and Jimi keeps going at it and going at it. At one point Brian Jones walks into the studio drunk out of his mind and starts to play piano. Jimi politely lets him play, I think on take 20 or 21, and then excuses him by saying “No, I don’t think so, Brian.” Then by take 25 it’s a 4 star, take 26 is good but take 27 is the master, you can just tell. Everything is perfectly placed and has the intensity that Jimi wanted, so the song evolved because it had to. There was no time for rehearsal, this was something that had to be learned in the studio. It’s not the way you want to do it, but because he’s a musician of that stature, you don’t mind if it takes 30 takes."

----------------------------------

Tuesday, September 30, 2014

Drum Prep Checklist

Sad Snare image
The drums are the heartbeat of any recording and the secret to a great drum sound that anchors the song is the drums themselves. Here's a quick checklist from my The Recording Engineer's Handbook 3rd edition that will help you get a great acoustic drum sound in the room.

"Now that we’ve looked more closely at what it takes to make a drum kit sound great, here’s a simple checklist to follow before you set up any mics.
  • Have the heads on all the drums been changed? Be sure to change at least the top heads before recording
  • Have the drums been tuned? Are they tuned to work with the other drums in the kit?
  • Are there any sympathetic vibrations occurring? Tune the drums so that any drum that’s hit does not cause another to ring.
  • Is there an unwanted ring? Suppress it with tape, a muffling ring, or MoonGel.
  • Is the hardware quiet? Spray with a lubricant like WD-40 if not.
  • Is the level of the cymbals all the same? Balance the level with lighter or heavier cymbals as needed.
  • Is there another snare drum available? A song may call for a different snare drum sound."
If you follow the above checklist, you'll find that your drums will sound so much better before you even place the mics.

To read additional excerpts from The Recording Engineer's Handbook and my other books, go to the excerpts section of bobbyowsinski.com.
----------------------------------

Tuesday, June 3, 2014

How To Avoid Electronic Phase Cancellation On A Drum Kit

Checking Microphone Polarity image
Things happen in the course of a recording session. Knobs get turned, switches get flipped, plugins are bypassed and then forgotten about later, which can result in something sounding not quite right.

A big problem when recording drums is phase cancellation because there are so many mics normally used. Here's an excerpt from the 3rd edition of The Recording Engineer's Handbook that will show you a foolproof way of avoiding electronic phase cancellation on your kit.

"One of the things that you’ll see frequently throughout this book are references to a phenomena known as “phase cancellation.” One of the most overlooked aspects of recording is how microphones interact with each other, both acoustically and electrically. 
The reason why this is a concern is that it only takes a single out-of-phase mic to destroy the sound of a multi-miked instrument like a drum kit, and if not corrected, the sound may never be able to be fixed.

There are two types of phase cancellation; electronic and acoustic. Most of the phase problems we’ll discuss in the book are acoustic in nature, but  there’s also an instance of electronic phase cancellation that you should know about as well. Keep in mind that this has nothing to do with mic placement as it’s strictly an electronic problem that never shows up until multiple mics are used.

Electronic phase problems are almost always caused by a cable in the studio (usually a mic cable) that’s been mis-wired during an install, repaired incorrectly, or originally wired incorrectly from the factory (which is rare). The polarity check is used mainly to be sure that all mics are pushing and pulling the same way and to check for mis-wired cables, which happen more than you’d think even in some of the best facilities in the world. 

Checking The Polarity
Checking microphone polarity should be one of the first things that an engineer does after all the mics are wired up and tested, especially if you’re working in an unfamiliar studio. This is especially true before a tracking session where a lot of mics will be used, since having just one mic out of phase can cause an uncorrectable sonic problem that will most likely haunt that recording forever. A session that is in-phase will sound bigger and punchier while just one out-of-phase mic can make the entire mix sound tiny and weak.

For this test we’ll be using the phase switch on the mic preamp, DAW interface or console, since it’s really a polarity switch that changes the phase by 180 degrees at all frequencies by swapping pins 2 and 3 of a balanced microphone line. Here’s the test:

1. After the mics are set up, wired and checked, but not necessarily placed, pick one mic that can be easily moved. This can be a scratch vocal mic, a hat mic, or a guitar mic; it doesn’t matter as long as it works, sounds good to begin with (meaning that it’s not defective) and can move next to the farthest mic used in the session. This mic will become our “gold standard.”

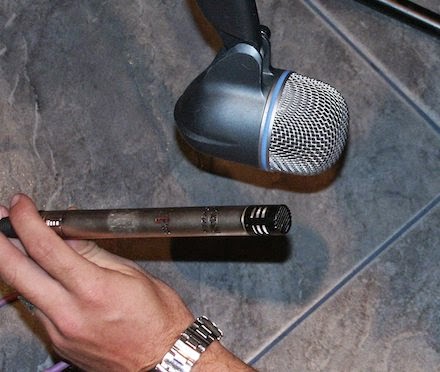
2. With the gold standard mic in hand, move it next to the kick drum mic (or any other mic that you wish to test for that matter). Place both mics together so the capsules touch and speak into them from about a foot away (the distance isn’t critical - see the figure on the left).

3. Bring up the faders on both mics so the audio level (not the fader position) is equal on both. You can check this by making sure that the level meters read the same.

4. Flip the phase of the mic under test (in this case, the kick mic) and choose the position that gives you the most low end.

5. Repeat with all the other mics used on the session.

Remember, you’re not flipping the phase of the gold standard mic; only the one that you’re testing."

To read additional excerpts from The Recording Engineer's Handbook 3rd edition and my other books, go to the excerpts section of bobbyowsinski.com.
----------------------------------

Tuesday, May 27, 2014

How To Find The Optimum Mic Placement Position

Snare Mic image
Mic placement may be the most important part of recording since a change of half-an-inch can sometimes make a huge difference in the sound. Finding that correct placement isn't always easy though, so here's an excerpt from The Recording Engineer's Handbook 3rd edition to give you some easy tips to find that "sweet spot" quickly.

"Quickly finding a mic’s optimum position is perhaps the single most useful talent an engineer can have. Sometimes the search resembles questing for the Holy Grail as more trial and error is involved. That said, you should always trust your ears first and foremost by listening to the musician in the tracking room, finding the sweet spot, and placing your microphone there to begin. If you don’t like the resultant sound, then move the mic or swap it with another. EQ is the last thing you should touch. 
TIP: Mics cannot effectively be placed by sight, which is a mistake that is all too easy to make (especially after reading a book like this). The best mic position cannot be predicted, it must be found.
How to Find the “Sweet Spot”
How you listen to an instrument in the studio is just as important as the act of trying to capture its sound. As good as many microphones are, they’re still no match for our ears, and we can sometimes be fooled in what we’re hearing over the monitor speakers. Here are a few tips to help you listen more closely to the way the mic your using is capturing the sound.
  • To correctly place an omni microphone, cover one ear and listen with the other. Move around the player or sound source until you find a spot that sounds best.
  • To place a cardioid microphone, cup your hand behind your ear and listen. Move around the player or sound source until you find a spot that sounds best.
  • For a stereo pair, cup your hands behind both ears. Move around the player or sound source until you find a spot that sounds best.
Before you start swapping gear, know that the three most important factors in getting the sound you want are mic position, mic position and mic position. Get the instrument to make the sound you want to record first, then use the cover-your-ears technique to find the sweet spot, position the mic, then listen. Remember that if you can’t hear it, you can’t record it. Don’t be afraid to repeat as much as necessary, or to experiment if you’re not getting the results you want."

----------------------------------

Wednesday, January 29, 2014

7 Tips For Improving Your Drum Sound

Parallel Room Mics image from Bobby Owsinski's Big Picture production blog
When it comes to drum sounds, sometimes the smallest details can make a big difference when you consider that there are usually multiple mics involved. Changing one thing can sometimes make a difference, but sometimes it's the fact that many small adjustments have a cumulative effective on the overall sound. Here are 7 tips culled from The Recording Engineer's Handbook 3rd edition that can individually or together improve your recorded drum sound.

1. Microphones aimed at the center of the drum will provide the most attack. For more body or ring, aim it more towards the rim.

2. The best way to hear exactly what the drum sounds like when doing a mic check is to have the drummer hit the drum about once per second so there’s enough time between hits to hear how long the ring is.

3. Try to keep any mics underneath the drums at a 90 degree angle to the mic on top to keep the acoustic phase shift to a minimum.

4. Most mics placed underneath the drums will be out of phase with the tops mics. Switch the polarity on your preamp, console or DAW and choose the position that has the most bottom end.

5. Try to keep all mics as parallel as possible to keep the acoustic phase shift to a minimum (see the graphic on the left).

6. The main thing about mic placement on the drums is to place the mics in such a way where the drummer never has to be concerned about hitting them.

7. The ambient sound of the room is a big part of the drum sound. Don’t overlook using room mics where possible (see the graphic on the left).

The above tips can generally apply to just about any drum miking setup, but remember to listen carefully after each adjustment to note the difference, if any, that occurs, then make sure it fits with the track.

You can read additional excerpts from The Recording Engineer's Handbook and my other books on the excerpt section of bobbyowsinski.com.
----------------------------------

You should follow me on Twitter and Facebook for daily news and updates on production and the music business.

Don't forget to check out my Music 3.0 blog for tips and tricks on navigating social media and the new music business.

Tuesday, January 14, 2014

An Interview With "The Drum Doctor"

Drum Doctor Ross Garfield image from Bobby Owsinski's Big Picture blog
We all know that the drums are the heartbeat of a song, and a wimpy drum sound will make the engineer work so much harder during the mix. That's why it's so important to get the drums to sound great acoustically before the mics are even placed. That said, it's surprising how little many engineers actually know about making a drum kit sound great acoustically.

Here's an excerpt from The Recording Engineer's Handbook 3rd edition that features an interview with the famous "Drum Doctor" Ross Garfield, who's been responsible for the actual drum sound on a multitude of huge records by some giant artists. Ross give some hints on how to take almost any kit and make it ready to record.

"Anyone recording in Los Angeles certainly knows about The Drum Doctors, the place in town to either rent a great sounding kit or have your kit fine-tuned. Ross Garfield is the “Drum Doctor” and his knowledge of what it takes to make drums sound great under the microphones may be unlike any other on the planet. Having made the drums sound great on platinum selling recordings for the likes of Bruce Springsteen, Rod Stewart, Mettalica, Marilyn Manson, Dwight Yokum, Red Hot Chili Peppers, Foo Fighters, Lenny Kravitiz, Michael Jackson, Sheryl Crow, and many more than what can comfortably fit on this page, Ross agreed to share his insights on drum tuning.  

What’s the one thing that you find wrong with most drum kits that you run into to?
I think most guys don’t know how to tune their drums, to be blunt. I can usually take even a cheap starter set and get it sounding good under the microphones if I have the time. It’s really a matter of people getting in there and changing their heads a lot. Not for the fact of putting fresh heads on as much as the fact that they’re taking their drums apart and putting them back together and tuning them each time. The repetition is a big part of it. Most people are afraid to take the heads off their drums.  

When I get called into a session that can’t afford to use my drums and they just want me to tune theirs, the first thing I’ll do is put a fresh set of heads on.  

How long does it take you to tune a set that needs some help?
Usually well under an hour. If I have to change all the heads and tune them up it’ll take about an hour before we can start listening through the mics. I try to tune them to what I think they should be, then when we open up the mics and hear all the little things magnified, I’ll modify it. Once the drummer starts playing, I like to go into the control room and listen to how they sound when he plays, then once the band starts I’ll see how the drum sound fits with the other instruments.

What makes a drum kit sound great?
I always look for a richness in tone. Even when a snare drum is tuned high, I look for that richness. For example, on a snare drum I like the ring of the drum to last and decay with the snares. I don’t like the ring to go past the snares. And I like the toms to have a nice even decay. Usually I’ll tune the drums so that the smallest drums have a shorter decay and the decay gets longer as the drums get bigger. I think that’s pleasing.

What’s the next step to making drums sound good after you change the heads?
I tune the drums on the high side for starters. For tuning, you’ve got to keep all of the tension rods even so they have the same tension at each lug. You hit the head an inch in front of the lug, and if you do it enough times you’ll hear which ones are higher and which are lower. The pitch should be the same at each lug, then when you hit it in the center you should have a nice even decay. I do that at the top and the bottom head.

Are they both tuned to the same pitch?
I start it that way, and then take the bottom head down a third to a fifth below the top head.

I’ve been in awe of the way you can get each drum to sound so separate without any sympathetic vibrations from the other drums. Even when the other drums do vibrate, it’s still pleasing. How do you do that?
Part of that is having good drums and that’s the reason why I have so many; so I can cherry-pick the ones that sound really good together. The other thing is to have the edges of the shells cut properly. If you take the heads off, the edges should be flat. I check it with a piece of granite that I had cut that’s perfectly flat and about two inches thick. I’ll put the shell on the granite and have a light over the top of the shell. Then I’ll get down at where the edge of the drum hits the granite. If you see light at any point then you have a low spot. So that’s the first thing; to make sure that your drums are “true.”  

The edges should be looked at anyway because you don’t want to have a flat drum with a square edge; you want it to have a bevel to it. If you have a problem with a drum, you should just send it in to the manufacturer. I don’t recommend anyone trying to cut the edges of their drums themselves. It doesn’t cost that much and it’s something that should be looked at by someone who knows what to look for.  

Once you get those factors in play, then tuning is a lot easier. I tend to tune each drum as far apart as the song will permit. It’s easy to get the right spread between a 13 and a 16 inch tom, but it’s more difficult to get it between a 12 and a 13. What I try to do is to take the 12 up to a higher register and the 13 down a little. The trick to all that is the snare drum because the biggest problem that people have is when they hit the snare drum there’s a sympathetic vibration with the toms. 

The way I look at that is to get the snare drum where you want it first because it’s way more important than the way the toms are tuned. You hear that snare on at least every two and four. The kick and snare are the two most important drums and I tune the toms around that and make sure that the rack toms aren’t being set off by the snare. The snare is probably the most important drum in the set because for me it’s the voice of the song. I try to pick the right snare drum for the song because that’s where you get the character.  

Do you tune to the key of a song?
Not intentionally. I have people who ask me to do that, and I will if that’s what they want, but usually I just tune it so it sounds good with the key of the song. If there’s a ring in the snare, I try to get it to ring in the key of the song, but sometimes I want the kit just to stand on its own because if it is tuned in the key of the song and one of the players hit the note that the snare or kick is tuned to, then the drum kind of gets covered up, so I tend to make it sound good with the song rather than in-pitch with the song.

Would you tune things differently if you have a heavy hitter as opposed to someone with a light touch?
Yeah, a heavy hitter will get more low end out of a drum that’s tuned higher just because of the way he hits, so I usually tune a drum a little tighter. I might move into different heads as well, like an Emperor or something thicker.  

How about the kick drum? It’s the drum that engineers spend the most time on. 
It’s weird for me because I always find them to be pretty easy because you muffle the kick drum on almost every session and when you do, it makes tuning easier. On the other hand, a tom has as much life as possible with no muffling.  

What I would recommend is to take a down pillow and set it up so that it’s sitting inside the drum touching both heads. From there you can experiment, so if you want a deader, drier sound then you push more pillow against the batter head, and if you want it livelier, then you push it against the front head. That’s one way to go.

Another way to go is to take 3 or 4 bath towels and fold one of them so it’s touching both heads. If that’s not enough then put another one in against both heads on top of the first one. If that’s not enough then put another one in. Just fold it neatly so that they’re touching both heads. That’s a good place to start, then experiment from there.

Do you prefer a hole in the front head?
It makes it easier. I do some things without holes in the front head, but having it really makes it easy to adjust anything on the inside. No front head is good too. It’s usually a drier sound and you’re usually just packing the towels against the batter head. Just put a sandbag in front to hold the towels against the head.  

How about cymbals?
One thing for recording is that you probably want a heavier ride but you don’t want that heavy of a cymbal for the crashes. You also have to be careful when you mix weights. For example, if you’re using Zildjian A Custom crashes you don’t want to use a medium.  You want to stay with the thins rather than try to mix in a Rock Crash with that because the thicker cymbals are made for more of a live situation. They’re made to be loud and made to cut and sometimes they can sound a little gong-like to the mics. On the other side of the coin, if you playing all Rock Crashes and the engineer can deal with the level, that’s not so bad either because the volume is even, but a thinner cymbal mixed in with those would probably disappear.  

What records better; big drums or smaller ones?
I depends what you want your track to sound like. When I started my company, people would always say to me “Why would someone want to rent your drums when they have their own set?” For one simple reason; most drummers have a single set of drums. If they’re going for a John Bonham drum sound, they’re not going to get it with say a “Ringo” set. A lot of times when they go into the studio, the producer says, “You know, I really heard a 24” kick drum for this song. I hear that extra low end,” but the drummer’s playing a 22, so it’s important to have the right size drums for the song. If you’re going for that big double headed Bonham sound, you really should have a 26. If you’re going for a Jeff Porcaro punchy track like “Rosanna,” then you should probably have a 22. That’s my whole approach; you bring in the right instrument for the sound you’re going for. You don’t try to push a square peg into a round hole.

How much does the type of music determine your approach?
The drums that I bring for a hip-hop session are actually very close to what I bring for a jazz session. Usually the hip-hop guys want a little bass drum like an 18 and that’s what’s common for a jazz session, to have an 18 or a 20. Then maybe a 12 or a 14 inch rack tom, which is also similar to the jazz setup. The big difference is in the snare and hi-hats and the tuning of the kick drum and the snare.

On a jazz session I would keep the kick drum tuned high and probably not muffled. On a hip-hop record I would tune the kick probably as low as it would go and definitely not have any muffling so it has that big “boom” as much as possible. I would also have a selection of snares from like a 4 by 12 inch snare, 3 by 13 and maybe a 3 by 14. On a jazz record, I’d probably send them a 5 by 14 and a 6 1/2 by 14. The hi-hats on a jazz record would almost definitely be 14’s where a hip-hop record you’d want a pair of 10’s or 12’s, or maybe 13’s.

Obviously it’s open to interpretation because I’m sure a lot of hip-hop records have been made with bigger sets, but when I’ve delivered what I just said, it usually rocks their boat.


For more on The Drum Doctors, go to drumdoctors.com."

----------------------------------

You should follow me on Twitter and Facebook for daily news and updates on production and the music business.

Don't forget to check out my Music 3.0 blog for tips and tricks on navigating social media and the new music business.

LinkWithin

Related Posts Plugin for WordPress, Blogger...