Get This Free Cheat Sheet Guaranteed To Help Your Next Mix

Monday, June 2, 2014

Inside The Tom Scholz Guitar Sound

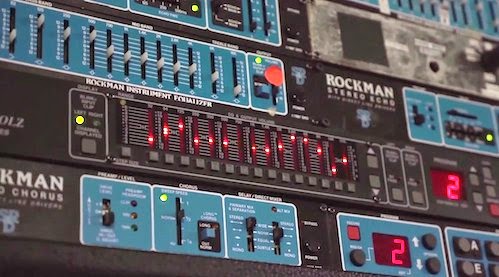
Tom Scholz Rockman Gear Rack image
Tom Scholz is the genius behind the classic band Boston, but he's also responsible for the rise in the processed guitar sound that directly lead to the big guitar racks of the 80s and even today's pedalboards. Scholz's sound and subsequent guitar products influenced not only guitarists of his generation, but every electric guitar player since.

Here's an interesting video taken behind the scenes in Toms personal studio where he shows many of the secrets to that great Boston guitar sound. There's not a lot of details since it's an NPR video, but it's interesting nonetheless.


----------------------------------

Sunday, June 1, 2014

New Music Gear Monday: The Magic AB Plugin

Calibrating your ears before you mix is an essential part of the preparation process for most engineers. Playing a few CDs or files that you know sound great gets you in tune with your speakers and environment. It's also great to switch back to those songs every so often during a mix just to make sure that you're on track frequency-wise.

In the DAW world, this is more complicated than it should be, since you have to import the songs into the session, which takes time and system resources. That's all in the past now, thanks to Sample Magic's ingenious Magic AB plugin.

Magic AB lets you instantly compare your current mix to any of 9 other tracks with just a mouse click. Plus you can set loops, playback points and even adjust the volume of each file, so you can also compare to the exact point in the song that's needed. It will also accommodate a variety of audio file formats, all without having to import them into the session.

This is a great tool for someone just learning how to mix, since being able to compare what you're doing with other tracks is a great way to learn quickly. That said, experienced engineers will also find it useful for getting a feel for a new mixing environment or speakers, or just as a quick check during a mix.

Sample AB is available at the Samplemagic.com for $58.50 (although you can pay in British Pounds or Euros as well). Here's a Quick Start video on how the plugin works.


----------------------------------

Friday, May 30, 2014

EveAnna Manley On The Latest Inner Circle Podcast

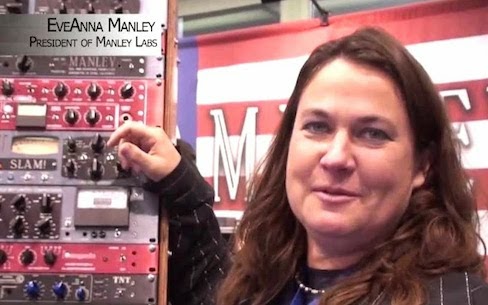
EveAnna Manley image
She's one of the nicest and most knowledgeable people in the audio business, and you can hear how EveAnna Manley built Manley Labs into a pro audio and hi-fi powerhouse on the latest edition of my Inner Circle Podcast.

Also, check out show #6 featuring jingle producer David Campos, as he explains the differences between writing and producing songs and jingles, as well as all the other things you never hear about that side of the business.

Check out the podcasts are bobbyoinnercircle.com or on iTunes.
----------------------------------

Thursday, May 29, 2014

Red Hot Chili Peppers "Give It Away" Isolated Rhythm Tracks

One of the most solid and dynamic rhythm sections in modern music belongs to The Red Hot Chili Peppers, with drummer Chad Smith and bassist Flea about as good as it gets. Here's the isolated bass and drums to one of their first hits - "Give It Away," from the groups 5th studio album Blood Sugar Sex Magik. Here's what to listen for.

1. There's a lot of long reverb on the snare. And it pops through the mix because he's hitting it so hard.

2. The kick is on the left channel, although it's not like that on the final mix of the record. The final sound of the kick is also different, as you'd expect.

3. Listen to how solid and controlled the high-hat work of Chad Smith is. It doesn't move the entire song.

4. The bass is well controlled. Considering how aggressive Flea plays, the level is very steady and even. This type of playing is some of the most difficult for an engineer to deal with.

5. There are a few slight bass mistakes at 2:12 (at the end of the lick on the turnaround), at 3:36, and at 3:42 that we'd fix today in the era of the DAW (this was recorded back in the tape days), but I bet you never heard them in the context of the song.

6. Listen through to the end to hear the ending that's not on the final record.

If you like looking at the inside workings of a hit, check out my Deconstructed Hits series of books, where I take a detailed look at the song form, arrangement, sound and production of the hits we love.


----------------------------------

Wednesday, May 28, 2014

Dig That Crazy Tesla Coil Sound

Giant Tesla Coils have been used on science fiction movies for about a hundred years now, but who knew they could be so musical?

Now two electrical engineering students (Eric Goodchild from ASU Polytechnic and Steve Caton from UCLA) found a way to modulate their 7 foot coils to play The Animals classic "House of the Rising Sun."

Each coil is capable of generating a 13 foot spark that equates to around 500,000 volts of electricity! The musical tones are made by varying the number of sparks per second, demonstrating a phenomenon known as electrical resonance.

Kids, don't try this at home (unless you're an EE, of course).


----------------------------------

Tuesday, May 27, 2014

How To Find The Optimum Mic Placement Position

Snare Mic image
Mic placement may be the most important part of recording since a change of half-an-inch can sometimes make a huge difference in the sound. Finding that correct placement isn't always easy though, so here's an excerpt from The Recording Engineer's Handbook 3rd edition to give you some easy tips to find that "sweet spot" quickly.

"Quickly finding a mic’s optimum position is perhaps the single most useful talent an engineer can have. Sometimes the search resembles questing for the Holy Grail as more trial and error is involved. That said, you should always trust your ears first and foremost by listening to the musician in the tracking room, finding the sweet spot, and placing your microphone there to begin. If you don’t like the resultant sound, then move the mic or swap it with another. EQ is the last thing you should touch. 
TIP: Mics cannot effectively be placed by sight, which is a mistake that is all too easy to make (especially after reading a book like this). The best mic position cannot be predicted, it must be found.
How to Find the “Sweet Spot”
How you listen to an instrument in the studio is just as important as the act of trying to capture its sound. As good as many microphones are, they’re still no match for our ears, and we can sometimes be fooled in what we’re hearing over the monitor speakers. Here are a few tips to help you listen more closely to the way the mic your using is capturing the sound.
  • To correctly place an omni microphone, cover one ear and listen with the other. Move around the player or sound source until you find a spot that sounds best.
  • To place a cardioid microphone, cup your hand behind your ear and listen. Move around the player or sound source until you find a spot that sounds best.
  • For a stereo pair, cup your hands behind both ears. Move around the player or sound source until you find a spot that sounds best.
Before you start swapping gear, know that the three most important factors in getting the sound you want are mic position, mic position and mic position. Get the instrument to make the sound you want to record first, then use the cover-your-ears technique to find the sweet spot, position the mic, then listen. Remember that if you can’t hear it, you can’t record it. Don’t be afraid to repeat as much as necessary, or to experiment if you’re not getting the results you want."

----------------------------------

Monday, May 26, 2014

Farewell Bob Tudor

Bob Tudor answering a question at PreSonusphere
Over the weekend came the sad news that PreSonus CTO Bob Tudor passed away after a long battle with cancer, and the audio manufacturing community mourns.

Many of you aren't aware of Bob and you should be, because he's so influential in digital console and recorder design and development, having a major hand in the Mackie and PreSonus StudioLive consoles as well as the Tascam US-2400 control surface and X-48 hard-disk recorder and various digital products for QSC, Samson, MAudio, Shure, Alesis, Gibson, Fender and more. His products garnered 5 TEC awards, 5 MIPA awards, as well as many others.

Bob wasn't just an electronics boffin though, he was an accomplished recording engineer and keyboard player as well, working with everyone from Peter Wolf/J. Geils Band to Extreme to Aimee Mann to Billy Idol, among others.

What I remember most about Bob was a conversation we had about a year ago when I was at the factory getting some background information while I was writing the PreSonus StudioLive Handbook.

"Cancer was the best thing that ever happened to me," he said during a private moment in his office. I looked at him rather incredulous that something so terrible could be looked at in that light, but he went on to explain, "It caused me to look at my life in a different way and to see what actually is important, and what isn't." Bob continued, "If it wasn't for cancer, I wouldn't have met the love of my life, and whatever time I've had with her makes it completely worth it."

He was totally at peace with himself and his lot in life. Not many of us can say the same.

So long, Bob. Thanks for the great products. We're gonna to miss you.
----------------------------------

Sunday, May 25, 2014

New Music Gear Monday: The DW Moon Mic

All hail the subkick mic. All hail the latest version of the subkick - the DW Moon Mic.

Moon MIc Comparison Chart
So many engineers swore by the homemade subkick mic (originally made from the woofer of a Yamaha NS10 monitor) to capture the ultra-lows of a kick drum that Yamaha eventually came out with their own factory version of it called the SKRM 100. Unfortunately most engineers who had used a homemade subkick mic previously weren't entirely happy with the SKRM, since the sound definitely changed, likely due to the speaker housing and different driver used. Enter the DW DK27 Moon Mic, which is the next generation of subkick mic.

The Moon Mic is different in a variety of ways from either a homemade or Yamaha subkick (see the comparison chart on the left). First is the fact that it uses an 8" woofer instead of a 6 1/2" like the Yamaha, and has an extended frequency range so it picks up more than just the ultra-lows of the drum. Then it's directional so there's better isolation that what you get from the bi-directional Yamaha version. It also has a higher impedance, eliminating the need for a pad, and a built-in phase invert switch. Add to that the fact that it can be mounted with a variety of different hardware, including a traditional mic stand, and you have a next generation subkick mic.

More information can be found at moonmics.com or in the video below. The DK27 retails for $399.


----------------------------------

Thursday, May 22, 2014

Rod Stewart "Maggie Mae" Song Analysis

I haven't done a song analysis for a while, so here's one from my Deconstructed Hits: Classic Rock book - Rod Stewart's big hit "Maggie Mae." As with all song analysis, it's broken down into the song, the arrangement, the sound and the production.

"The breakout song from Rod Stewart's first solo album Every Picture Tells A Story was "Maggie May," which eventually topped the charts in both the US and the UK and launched his solo career. The song was originally released as a B-side of another song from the album, “Reason To Believe,” but after DJ’s began playing “Maggie May” instead, the song was re-categorized as the A-side. 

The mandolin part featured on the intro of the song was played by Ray Jackson of Lindisfarne, who sued Stewart for back royalties in 2003 even though he was paid as a session player. Supposedly drummer Micky Waller broke his bass drum pedal and had to play it with a stick, which is the reason why it doesn’t have much punch. Ironically, the song was almost left off the album because the record label didn’t feel it had a strong enough melody, but had to be included in the end as Rod ran out of time to replace it.

THE SONG
“Maggie May” only has three sections, verse, chorus and solos, but the distinction between the verse and chorus isn’t very strong. The song form looks like this:

intro ➞ verse ➞ chorus ➞ verse ➞ chorus ➞ verse ➞ chorus ➞ solo ➞ verse ➞ chorus ➞ solo ➞ interlude ➞ outro

Rod’s record label didn’t feel that the melody was strong enough, and while that might not be true, the fact that there’s not much of a difference between the verse and chorus melody and there’s really not a hook let’s you understand their trepidation.

The lyrics tell a supposedly true story of a jilted young lover, and while the story line is strong, Rod makes not effort to rhyme, especially in the chorus. That’s never bothered record buyers though, as millions of women everywhere suddenly felt they had some Maggie May in them. Interestingly enough, although Stewart sings “Maggie” in a number of places, he never actually sings “Maggie May” in the entire song.

THE ARRANGEMENT
Much of the playing in “Maggie May” is very loose, and you get the feeling that they didn’t do many takes to figure out each player’s part. That said, there is a specific arrangement that works well. Here's what the arrangement elements look like:

Arrangement Elements
  • The Foundation: drums, bass
  • The Rhythm: 12 string acoustic guitar, electric piano
  • The Pad: organ
  • The Lead: lead vocal, mandolin, guitar solo
  • The Fills: electric piano in fourth verse
The song begins with an intro of a mandolin and an acoustic 12 string along with the bass playing a counter line. When the verse begins, the lead vocal enters as does the drums. While the drums, organ and the 12 string play fairly straight, the bass never plays the same thing twice and is generally ad libbed throughout except for the intro and interlude. During the chorus (“You led me away from home…..”), the chord pattern changes but all the instruments as they were during the verse.

The next two verses and choruses have exactly the same instrumentation, but the chord pattern does change slightly during the guitar solo. During the fourth verse and chorus, an electric piano is added playing random arpeggiated chords.

The next solo is the same as the first one, except that it’s six bars long and plays bars seven and eight over the first two measures of the interlude. The interlude is the most different thing in the song as the 12 string drops out and is replaced by two mandolins that play similar (but not identical) melody lines, which is probably the signature line of the song. The bass also plays a more or less written line, imitating what he did on the intro. There’s also a high organ pedal note that’s doubled with an electric piano playing eighth notes. This continues for 20 measures (which is an odd number), and then the drums return as everything plays as they did in the section prior to the outro.

THE SOUND
The sound of “Maggie Mae” is fairly thin, especially the bass and kick drum, which have virtually no bottom end to them. Although not all of Rod’s band The Faces played on the album, this was generally the sound of the band throughout its life.

The panning is odd, with the drums panned hard to the left and the bass hard to the right. The intro and interlude has two mandolins that are spread slightly left and right, while everything else is panned to the center.

The song is bone dry, proving that hit records can be made without any effects whatsoever. Rod Stewart's vocal is clear and not overly compressed.

Listen Up:
  • To the drums panned hard to the left and the bass panned hard to the right.
  • To the doubled mandolins playing slightly different lines in the interlude.
  • To the mistake in the bass at :38 as it fails to follow the chord change.

THE PRODUCTION

Rod was the producer of the album, but as was many the case back then, that probably meant more selecting the take and setting the song’s feel rather than directing the the band like it is today. Plus, you can’t really say that he had a vision, since both he, his co-writer, and the record label didn’t think of “Maggie May” in the first place. That said, history has proven so many times that what artists, producers and record companies may not be in love with is just the thing that the public wants."

You can read additional excerpts from Deconstructed Hits: Classic Rock Vol.1 and my other books on the excerpts section of bobbyowsinski.com.
----------------------------------

Wednesday, May 21, 2014

Pete Thorn Guitar Tips

Pete Thorn is a great guitar player who's not only toured with the likes of Don Henley, Melissa Etheridge and Chris Cornell, but on albums for Alicia Keys, Courtney Love, and many others.

Here's a great video where he describes the guitar and amp gear he uses in his studio, and the intelligent way it's all put together for fast access. He also goes on to show a different type of guitar cabinet isolation that's an alternative to the methods in previous posts here.

Read an excerpt from the interview I did with Pete for my How To Make Your Band Sound Great book. Also, make sure to check out his website at peterthorn.com.


----------------------------------

Tuesday, May 20, 2014

2 Exercises To Find the Groove Of A Mix

Rhythm Section
Regardless of the genre of music, a mix will never be any good unless the song's groove is emphasized. Sometimes it's not easy to find and develop the groove, however, so here's a couple of exercises from the Audio Mixing Bootcamp to help you find it.


"The groove is the pulse of the song. While it usually comes from the drums and bass, it could really come from any instrument or even a vocal. And lest you think that the groove is predominantly a fixture of one type of music like funk or R&B, you’ll find that a strong groove exists in just about any type of good music, regardless of the genre or style. Don’t believe me? Listen to the US Marine Corps band play “Stars And Stripes Forever” and then listen to a typical high school band. The Marines have a groove that makes you want to jump up and march with them just as much as you want to shake your booty to a James Brown or Prince song.

The best way to develop the groove is to find the instrument or instruments in the song that supplies its pulse. As said before, it’s usually the bass and drums, but it could very well be a loop, a keyboard, a guitar, and rarely, a vocal. If a band is playing particularly well together, it may be several instruments at the same time.

Exercise 1Finding The Groove
A) Listen to the entire mix all the way through. Is there an instrument or instruments that establishes the pulse of the song?

B) If an instrument doesn’t stick out as being the pulse of the song, go through each track one by one and raise the level by about 3 dB. After you’ve listened, return it to its previous level position. Do you hear one or more tracks as establishing the pulse of the song now?

Understand that if you’re working on a song that wasn’t well performed, there may not be a track that establishes the groove. If that’s the case, it’s usually the producer’s call to recut the track, or you’ll just have to make due with the instrument that feels the best. Remember that mixing is always easier with well recorded tracks, great playing, and excellent arrangements.

Establishing The Groove
Once the instrument (or instruments) that establishes the groove is found, the next step is to emphasis it. This can be done by raising the level as little as one dB, or adding an extra bit of compression or EQ to make it stand out a bit more in the mix. Then make sure that the rest of the tracks support your groove instrument by tailoring the mix around it.

Take notice in the exercises below that we’re adding very small increments of level, compression or EQ. In theory, one dB is the minimum amount that the average person can hear according to most text books (it’s actually less than that), and sometimes that’s all you need to change the balance or feel in a mix. On just about anything in mixing, always begin with small increments first.

Exercise 2: After your groove tracks are found, try one or more of the following:
A) Raise the level of each of the groove tracks by one dB. Can you feel the groove better? If not, add another dB. Can you feel it now? If not, add another dB, but be cautious not to make the tracks too far out in front of the mix.

B) If your groove tracks are already being compressed, add another dB or two of compression. Keep the level the same by adjusting the Output control or raising the channel fader. Can you feel the groove better? If the groove tracks aren’t compressed, then refer back to Chapter 6 and add compression.

C) If your groove tracks are already equalized, add an additional dB at the EQ points. Can you feel the groove better? If not, add another dB. Can you feel it now? Be cautious that the tracks are not too far out in front of the mix or that they don’t clash with another instrument.


D) After the groove is established and drives the mix, do any final tweaks to the other tracks to make sure they’re not covered up or that they don’t clash with the groove tracks."

----------------------------------

Monday, May 19, 2014

Building A Guitar Isolation Box

One of the most popular posts ever on this blog was one about building an isolation box for a guitar amp, so I thought I'd post something similar, but his time with a different take on how to do it. What's different about this one is that the speaker is permanently mounted in the cabinet in it's own box within a box, and it starts out using Rockwool as the basic absorption material instead of foam.

Rockwool is the same stuff that's used in many recording studios and is a lot cheaper and much more effective than acoustic foam, if you can find it.  The other difference is that in the video he's using Rockwool batts. Ideally you'd want to use the more ridged Rockboard (or Owens Corning 703 ridged fiberglass), which takes up less room. The 2 inch thick product should do it.

Remember to make sure that the seal on the box is absolutely tight for maximum isolation. Air is like water and if any can leak out, there goes your isolation. Screw and glue the box together, then seal it on the inside with a couple of beads of caulking. You can find out more on construction in The Studio Builder's Handbook.


----------------------------------

LinkWithin

Related Posts Plugin for WordPress, Blogger...