Get This Free Cheat Sheet Guaranteed To Help Your Next Mix

Friday, March 6, 2015

Nirvana "Smells Like Teen Spirit" Isolated Vocals

Nirvana Onstage image
Very few artists or bands can change the direction of music but that's exactly what Nirvana did when they burst on the scene in 1991 with "Smells Like Teen Spirit" off of the band's debut album Nevermind (here's a great vinyl reissue).

It's one of the few songs by the band that's actually credited to all three band members as authors, which in this case came about after a number of arrangement changes by bassist Krist Novoselic and drummer Dave Grohl to the song that guitarist Curt Cobain brought into rehearsal.

Here are the isolated vocals from that song (which begins at 0:33) as well as what to listen for:

1. The lead vocal has an interesting reverb that sounds more like a long delayed ambience than a typical plate or hall effect. It's delayed and fairly short and dark so it blends into the track well.

2. Take notice that the B-section vocal is doubled and spread out in stereo a little to the left and right. The left vocal is a little drier than the right side, which is pushed back in the mix a very short amount.

3. The last lines of the verses and chorus again feature a doubled lead vocal that's back in the center of the mix.

4. Listen to the sounds of the open mic before the second verse at 1:40.

5. Listen all the way through to the end to hear the ending that didn't make the record.


----------------------------------

Thursday, March 5, 2015

Helping Lorde Rule The World

Michael Levine is my guest on the current Inner Circle podcast, so it's only appropriate that we take a look at a very cool video where he shows about how he helped Lorde do a dark and moody version of "Everybody Wants To Rule The World," which eventually became part of the soundtrack for the Hunger Games: Catching Fire soundtrack.


Don't forget to check out my Music 3.0 blog for tips and tricks on navigating social media and the new music business.

Wednesday, March 4, 2015

The 5 Ways To Charge For Your Musical Services

Charging For Services image
It's always tough to figure out how much to charge an artist or band that's not on a label for your services. Here's an excerpt from my Music Producer's Handbook that looks at the 5 different ways to charge a client for your production, engineering or musical services, as well as the advantages and disadvantages of each.

"What if a local band asks you to produce or record them? What do you charge if they’re not attached to a label? There are a number of approaches that you can take, although none will have you retiring to the Bahamas anytime soon. You can:
  • Charge a flat project fee. How much should that be? So much depends upon the type of project, how many overdubs you’ll need, the artist’s or band’s competency, the artist’s or band’s income level, and the number of songs. A jazz or blues band with 20 songs will usually take a lot less time than a pop band with 8 because of the type of music and the layering normally required with pop music. And if the band has a marginal player or two, that can almost double the time spent just trying to get the parts to match the other players in skill level (unless you can persuade them to use a session player.)
Usually, a flat fee is the least desirable way to get paid since projects have a tendency to go a lot longer than anticipated and will tend to drag on and on when the artist realizes that you get paid the same regardless of the time spent. If the flat fee is the easiest way or only way to get the gig, then that’s what you have to do, but otherwise, avoid it if you can unless you’ll very well compensated.
  • Charge a per-song fee. This is better than the flat project fee but not by much. All the same problem areas are still there with the exception that it can sometimes cause the artist to scale back from recording 15 songs to 10 (even though it’s a hit in your pocketbook). You won’t have to worry about the artist wanting to record an extra song at the last minute or suddenly wanting to complete a track originally deemed too weak after basic tracking. With a per-song rate, any additional songs and you have to get paid.
  • Get paid on spec. This is the way that most fledgling producers start their careers. The deal would be that if the artist or band “makes it” (meaning they get signed by a major label and get an advance), then you’ll get paid either your project fee, points, or both. The chances of that happening are always long no matter how much you believe in the act, so be prepared to spend your time working for free. The one good thing here is that you’ll be gaining experience.
If you’re going to work on contingency, you’ll need to get two things from the artist or band. The first thing is a larger deal than your normal rate to make it worth your while, since you’re specing your time. That could be anywhere from 20 to 50, even 100% more - whatever you can negotiate. You can justify it by saying, “I’m providing a lot of valuable time and expertise that you’re not paying me for right now. Maybe it’ll take a long time to see this money or maybe I’ll never see it. That’s worth an extra premium.”

The second thing is an agreement stating the terms of how much and under what circumstances you’ll get paid. While you should go to an attorney to get this drawn up, this can cost you money that you don’t have or don’t want to spend on a project that may never pay off. Even if it’s only a single page long, just be sure to get it in writing because people have a tendency to forget or remember differently over time and it pays to have something on paper. At the very least, put down what songs you’ve worked on (or going to work on), the amounts agreed upon, and a time frame that you’ll get paid (example - 30 days after signing a major or indie label agreement), and how you’ll get paid (“in full by cashiers check”) just so no one forgets. This may not be legally binding or may have plenty of holes that a high-priced lawyer can drive a truck through, but if the people you’re dealing are on the up and up, you’ll at least have a piece of paper to remind everyone of your contribution to their success and how you all agreed you’d be compensated.
  • Charge an hourly rate. The safest way to go as long as you can get paid, an hourly rate means that when you inevitably spend that extra week on overdubs or mixing, you’ll get paid for the time you’re putting in. The hourly rate keeps people focused and stops them from adding those extra 5 overdubs “just to see what they sound like,” or from trying 10 more takes when you all agreed that number 3 was great.
  • A combination of the above. Many times payment consists of a little bit of money or a little bit of spec, some items at a flat rate and some at hourly, or some combination. Try not to get too complicated. A simple deal works best for everyone, especially when it comes to getting paid. Just realize that there are a lot of options available.
There are a lot of good books on the subject of how to structure a deal for yourself that are much more comprehensive then what was just laid out above. Even if you decide not to read them, get an attorney if it means any money more than what the attorney will cost. At the very least, always get it in writing."


Don't forget to check out my Music 3.0 blog for tips and tricks on navigating social media and the new music business.

Tuesday, March 3, 2015

Music For Cats

Music for Cats image
After reading the headline you're probably thinking, "This is a joke, right?" Nope, it's the real deal.

A study published in the Applied Animal Behavioral Science journal found that many animals respond favorably to specific types of music, especially cats.

Researchers at the University of Wisconsin found that when played a specially prepared piece of music "...cats showed orientation and approach behavior toward the speaker with the cat music, rubbing against the speaker while the music was on."

This might sound like a bunch of hokum, but there's actually some science involved here. The researchers looked at the natural vocalizations of cats and matched the same frequency range, which is about an octave above a human's voice.

They then matched the tempos to the rhythms of a cat purring or suckling, and added a lot of sliding notes and frequencies, since that's what cats do normally in their calls.

The researchers tested this on 47 cats that were all domesticated house pets (including their own) and first played a couple of classical pieces (Gabriel Faure's "Elegie" and Bach's "Air on a G String") as a control. While the cats weren't frightened, they showed no interest (sounds familiar, right?).

When the researchers played the specially composed "cat music" created by David Teie, the cats responded by purring and rubbing up against the speakers.

I played the snippets of cat music found below for my two kitties (ages 12 and 11) and they both were more interested than they normally would be from any other music, one a little more than the other. No rubbing up against the speakers though.

The researchers found that certain breeds of cat respond more, as does either younger or older cats. Middle aged cats respond like..........cats.

If you own a kitty, play him one of the following snippets and see if he responds.

Spooks Ditty

Cozmo's Air

Rusty's Ballad

You might also want to check out the Music For Cats site. Do your cats dig this?

Don't forget to check out my Music 3.0 blog for tips and tricks on navigating social media and the new music business.

Monday, March 2, 2015

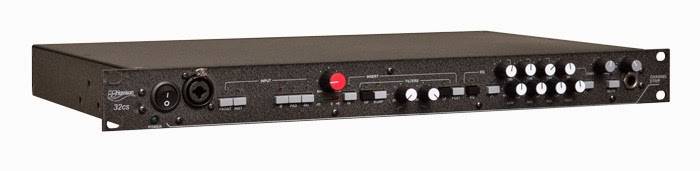
New Music Gear Monday: Harrison 32cs Channel Strip

Harrison 32cs channel strip image
Many people feel that one of the best sounding consoles ever was the Harrison 32C series. It's the signature sound of Michael Jackson's biggest hits as well as records by Queen, Sade and ABBA, among many others. Now you can have that sound at your fingertips with the new Harrison 32CS channel strip.

The 32cs features that good old transformer coupled mic preamp along with switchable high and low pass filters. What's interesting there is that the high pass filter has what Harrison calls a "Bump" switch that provides a boost right above the selected cutoff frequency - perfect for kick or bass.

The channel strip also features a 4 band semi-parametric EQ with switchable shelving and bell modes, a switchable insert point either pre or post filters,  and a host of input/output connects including a front panel combo jack, front panel headphone jack, and rear panel XLR input, output and insert jacks.

The 32cs also has a feature that's unique for a channel strip - a monitor/mix section with a 2 mix buss that allows zero-latency monitoring through the headphone jack or reach channel outputs. The Blend control on the front panel allows you to mix the output between the 32cs and a stereo source fed into the 2 mix input jacks on the rear of the unit.

As you can see, the Harrison 32cs isn't just another channel strip. The price is still to be determined. Here's a preview video from Rob Tavaglione where you see the unit first hand.


Don't forget to check out my Music 3.0 blog for tips and tricks on navigating social media and the new music business.

Friday, February 27, 2015

Composer Michael Levine On My Latest Inner Circle Podcast

Composer Michael Levine image
On the latest Inner Circle podcast I'm pleased to have composer Michael Levine as my guest.

Michael is unique in that he composes not only for film and television, but advertising as well.
On the show we'll discuss the difference and nuances of writing jingles (he wrote the famous "Give me a break" Kit Kat commercial), as well as his work on CBS's Cold Case, and his pieces on The Simpson's Movie and Batman Dark Night.

On the podcast intro I'll discuss the ins and outs of hiring a publicist as well as a warning of 3 TB hard drives.

Remember that you can find the podcast at BobbyOInnerCircle.com, or either on iTunes or Stitcher

Don't forget to check out my Music 3.0 blog for tips and tricks on navigating social media and the new music business.

Foreigner "Double Vision" Isolated Vocals

Foreigner Double Vision image
The band Foreigner is still around and going stronger than ever, but much of their current touring is based on past hits like "Double Vision," the song that we look at today. Here are the isolated vocals from that big hit, which reached #2 on the Billboard charts in 1978. Here's are some things to listen to (it starts around 0:20):

1. Take a listen to the long delayed reverb on the verse vocals. This is muted in the choruses so the vocal feels more intimate.

2. The chorus features a doubled lead vocal up the center, while the harmonies are panned to the outside.

3. You can clearly hear a punch in at 2:43 and 2:53, a relic from the old tape days.

4. The harmony vocals are doubled and panned left and right during the bridge at 2:39.

5. Note the flange on the last lead vocal line at 3:30.


Don't forget to check out my Music 3.0 blog for tips and tricks on navigating social media and the new music business.

Thursday, February 26, 2015

The Top 5 Mixing Mistakes And How To Avoid Them

audio mixing image
Every day someone asks me to listen to a mix and give my opinion. I wish I had time to do it more than I do, but unfortunately I can't always get around to it. That said, there are a number of mistakes that keep cropping up with the mixes I do hear. Here are the top 5 mixing mistakes that I come across.

1. The vocal or lead instrument gets lost. Words get lost or the vocal seems buried during certain sections of the song. This is what automation is for. Go back and ride that sucker so every word can be heard.

2. There's a big frequency build up from adding EQ at the same frequencies to a lot of tracks. Everything sounds better with EQ added, especially when it's soloed. The problem is that if you EQ most of your tracks at the same frequencies, you'll end up with a lot of tracks that sound great by themselves that fight each other when added to mix. Better to do your EQing without soloing, or solo up several channels at the same time, in order to avoid the problem. And remember that you don't always have to boost the EQ. Attenuating a frequency can be more effective.

3. The stereo spectrum is mushy. This comes from taking panning for granted and automatically panning stereo elements hard left and hard right. When that happens it no longer sounds like stereo anymore and becomes "Big Mono" as my buddy mixer Ed Seay calls it. Just because a keyboard is in stereo, it doesn't necessarily mean that it should be panned hard left and hard right. The same goes for overheads. Many mixers intentionally stay away from hard left and right and try to give every track it's own place in the stereo spectrum.

4. There's too much compression. As the great engineer Joe Chiccarelli stated in my Mixing Engineer's Handbook, "Compression is like this drug that you can’t get enough of. You squish things and it feels great and it sounds exciting, but the next day you come back and you say, “Oh God, it’s too much.” Sometimes you have to really squash something so it works in the mix, but usually a little goes a long way.

5. There's too much low EQ. It's very easy to get fooled into thinking that you don't have enough low end either because you're mixing on small nearfield monitors or you're mixing too quietly. When that happens, you'll find that the mix sounds great in your room but way to boomy everywhere else. Take a listen to a recording that you really love first to see where the low end is at or take a look at a spectrum analyzer before you add any.

If you want to get some great mixing tips and tricks, check out my 101 Mixing Tricks coaching program and get 4 free tricks right away.

Don't forget to check out my Music 3.0 blog for tips and tricks on navigating social media and the new music business.

Wednesday, February 25, 2015

Big Picture Blog Named In The Top 100 Music Blogs

I'm proud to announce that both my Music 3.0 music industry blog and Big Picture music production blog have been named in the The Ultimate Top 100 Music Blogs by Musicians Empowered. Thanks very much Sarah! And thank you everyone for your support!

Tips For Recording An Audience

Concert Audience image
If you're recording a live performance, then you want to pick up some of the audience to make it sound realistic. Here are some techniques and considerations culled from the latest edition of my Recording Engineer's Handbook.

"Audience recording is both the key and the problem with live recording. It’s sometimes difficult to record the audience in a way that captures its true sound. The transient peaks of the audience makes it not only difficult to capture well, but to isolate from the stage mics as well.

Considerations
  • Miking the audience lends itself to using omnidirectional mics, but shotgun mics can be especially useful because they help attenuate the intimate conversations from the crowd that happen around where the mic is placed. In the event you have neither type of microphone, just make sure that the mics that you use are identical models and don’t forget to engage the low-frequency rolloff switch if the mic has one.
  • Mic placement outdoors is a lot more difficult because you have nothing to hang microphones from to get enough distance over the audience. For another thing, you don’t have the ambience of the venue to help you out so you usually have to resort to more microphones as a result. Don’t forget the windscreens, because nothing makes a track unusable like wind blasting across the mic’s capsule.
  • Many engineers are tempted to use stereo recording techniques such as spaced pairs, X/Y, ORTF and Blumlien, but these can actually return some poor results when it comes to audience miking. What these setups do is capture the ambience of the environment and a perfect stereo picture, but your primary concern is just to capture the audience. They’re two different beasts and have to be handled that way.
  • It’s very easy to have audience microphones overload either from the stage volume of band or the peaks of the audience response. Therefore, it’s a good idea to heavily compress or limit them to prevent overload.
Placement
Technique #1: Place a pair of identical mics at about the half-way point between the edge of the stage and the back wall of the venue. Make sure that the mics are placed at least three feet above the audience. Start with the microphones facing directly at one another across the audience as in Figure 9.1, then aim them both down towards, but not exactly at, the middle of the audience.

Please Note: The higher you get the mics over the audience the better, but if you’re in a club with a low ceiling in a club, you’re better off with placement closer to the audience since the reflections from the ceiling can sometimes sound pretty bad.

Figure 9.1: Simple audience miking technique
Audience Miking Technique #1 image
  • Variation: If you only need a mono audience track, splay the mics off-access as in Figure 9.2. This configuration can result in a fuller sound in mono, but will result in a stereo track that’s off balance since one mic is pointed closer towards the stage and the main sound system than the other.
Figure 9.2: Simple audience miking technique variation for mono
Audience Miking Technique #1 variation

Technique #2: In a club, hang a couple of mics at about the middle of the venue pointing directly down from the ceiling. This is where omnidirectional mics come in handy. Be sure to hang each mic the same distance from the stage as the other if you want a balanced stereo image."

There are a number of other techniques for recording the audience that can be found in the book.


Don't forget to check out my Music 3.0 blog for tips and tricks on navigating social media and the new music business.

Tuesday, February 24, 2015

What Data Compression Really Sounds Like

We've been using MP3 data compression since the late 90s and for many people its good enough when it comes to sound quality. If you're used to listening to high quality audio in the studio though, you know that the MP3 version leaves a lot to be desired.

So what does data compression actually do? Lossy data compression actually dynamically eliminates frequencies from the audio that the ear won't notice based on an algorithm. It's throwing away data that hoping that you won't miss in order to get the file size smaller.

How much data? Well it could be a lot and it could be a little, depending upon the algorithm and the data rate you select.

Here's a great real world example where you can actually hear the data that's been eliminated using Suzanne Vega's "Tom's Diner." First you'll see and hear the original music video, then just the data that's been eliminated. It was created by Ph.D. candidate Ryan Maguire at the University of Virginia for a project called The Ghost In The MP3.

As a bonus, you'll also see what the video codec does to the video as well.


Don't forget to check out my Music 3.0 blog for tips and tricks on navigating social media and the new music business.

Monday, February 23, 2015

New Music Gear Monday: Rupert Neve Designs RNDI Direct Box

Anyone who's ever played with direct boxes knows that they're not created equally, especially when it comes to the bass guitar. Some sound thin and wooly while others are big and lush sounding, and that can make a big difference when it comes to the mix.

Rupert Neve's reputation as a console designer is unparalleled, having been at the forefront of the art for more than 50 years. Now he takes on the direct box with his new RNDI.

The RNDI is an active direct box based around a very high impedance (2 megaohm) discrete FET amplifier that utilizes a custom designed transformer as well (something that Neve has always been noted for). This is unusual in that most DIs either have one or the other, but the RNDI incorporates both, which the company says is responsible for its outstanding phase coherence and frequency response out to 100kHz.

The box features a 1/4 input jack that's capable of handling both instruments and line level with headroom of 21.5dBU. A speaker switch allows a direct connection from an amp as powerful as 1000 watts. A Thru jack is included in order to send the signal to an amplifier as well. Power comes via 48V phantom power.

The Rupert Neve Designs RNDI retails for $269 and is available now.


Don't forget to check out my Music 3.0 blog for tips and tricks on navigating social media and the new music business.

LinkWithin

Related Posts Plugin for WordPress, Blogger...