One exercise might take you in a direction that intentionally sounds bad in order for you to understand why a particular action isn't done much, while others will give you an idea of how why some other mixing actions are frequently used.
Here's an excerpt from the Adding Reverb chapter of the book along with a typical exercise.
------------------------------
Like with other aspects to mixing, the use of reverb is frequently either overlooked or misunderstood. Reverb is added to a track to create width and depth, but also to dress up an otherwise boring sound. The real secret is how much to use and how to adjust its various parameters.
Before we get into adding and adjusting the reverb in your mix, let’s look at some of the reasons to add reverb first
When you get right down to it, there are four reasons to add reverb.
1. To make the recorded track sound like it’s in a specific acoustic environment. Many times a track is recorded in an acoustic space that doesn’t fit the song or the final vision of the mixer. You may record in a small dead room but want it to sound like it was in a large studio, a small reflective drum room, or a live and reflective church. Reverb will take you to each of those environments and many more.
2. To add some personality and excitement to a recorded sound. Picture reverb as makeup on a model. She may look rather plain or even only mildly attractive until the makeup makes her gorgeous by covering her blemishes, highlighting her eyes, and accentuating her lips and cheekbones. Reverb does the same thing with some tracks. It can make the blemishes less noticeable, change the texture of the sound itself, and highlight it in a new way.
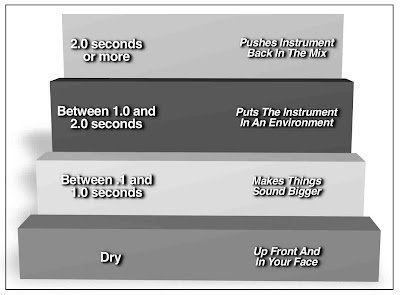
3. To make a track sound bigger or wider than it really is. Anything that’s recorded in stereo automatically sounds bigger and wider than something recorded in mono, because the natural ambience of the recording environment is captured. In order to keep the track count and data storage requirements down, most instrument or vocal recordings are done in mono. As a result, the space has to be added artificially by reverb. Usually, reverb that has a short decay time (less than one second) will make a track sound bigger.
4. To move a track further back in the mix. While panning takes you from left to right in the stereo spectrum, reverb will take you from front to rear (see Figure 8.1). An easy way to understand how this works is to picture a band on stage. If you want the singer to sound like he’s in front of the drum kit, you would add some reverb to the kit. If you wanted the horn section to sound like it was placed behind the kit, you’d had more reverb. If you wanted the singer to sound like he’s in between the drums and the horns, you’d leave the drums dry and add a touch of reverb to the vocal, but less than the horns.
If we were going to get more sophisticated with this kind of layering, we’d use different reverbs for each of the instruments and tailor the parameters to best fit the sound we’re going after.
Timing A Reverb To The Track
One of the secrets of hit making engineers is that they time the reverb to the track. That means timing both the pre-delay and the decay so it breathes with the pulse of the track. Here’s how it’s done.
The decay of a reverb is timed to the track by triggering it off of a snare hit and adjusting the decay parameter so that the decay just dies by the next snare hit. The idea is to make the decay “breathe” with the track.
Exercise Pod - Timing Reverb Decay
Before you begin any of the exercises in this chapter, be sure to have two reverbs with the sends and returns already set up. Set one reverb to “Room” (we’ll call it Reverb #1) and the other to “Hall” (Reverb #2). Refer to your DAW or console manual on how to do this.
E8.1: Solo the snare drum and the reverb returns (or put them into Solo Safe - refer to you DAW or console manual on how to do this). Be sure that the Dry/Wet control is set to 100% wet, and the return levels are set at about -10.
A) Raise the level of the send to the Room reverb until the reverb can be clearly heard. Does the snare sound distant? Does it sound bigger than before?
B) Adjust the Decay parameter until the reverb dies out before the next snare hit of the song. Does the snare sound clearer?
C) Mute the send to the Room reverb and raise the level to the Hall reverb. Does the snare sound distant? Does it sound bigger than before? Does it sound bigger than the Room reverb?
D) Adjust the Decay parameter until the reverb dies out before the next snare hit of the song. Does the snare sound clearer? Does it sound bigger?
E) Adjust the Decay parameter until the reverb dies out before the 2nd next snare hit after the initial hit. Does the snare sound clearer? Does it sound bigger?
You can get more info on The Audio Mixing Bootcamp here, and read additional excerpts from this and other books at bobbyowsinski.com.
----------------------------------
You should follow me on Twitter for daily news and updates on production and the music business.
Don't forget to check out my Music 3.0 blog for tips and tricks on navigating social media and the new music business.


2 comments:
Finally! Will this be available on Amazon soon?
The book is now available on Amazon.
http://www.amazon.com/gp/product/0739082396/ref=as_li_qf_sp_asin_il_tl?ie=UTF8&tag=bobbowsi-20&linkCode=as2&camp=1789&creative=9325&creativeASIN=0739082396
The companion video course is here at Lynda.com. There's a free 7 day trial if you use this link.
http://lynda.com/trial/bowsinski
Post a Comment