Get This Free Cheat Sheet Guaranteed To Help Your Next Mix

Monday, June 16, 2014

Thinking Outside The Box With 10 Second Songs

Most musicians are pretty good at imitating another artist or style, or even two, but usually don't go much beyond that. Anthony Valbiro can do a lot more than than just a couple, and he displays it here with a video of how 19 different artists would perform Jason Derulo's "Talk Dirty." All told there are 20 different versions of the same song, each 10 seconds long.

This is a great idea of thinking outside the box both in terms of displaying your ability and doing a good piece of viral video marketing as well. Anthony has a website entitled tensecondsongs.com that has additional examples of the technique, as well as custom song offerings for fans and businesses (also a great idea). Check it out.


----------------------------------

Sunday, June 15, 2014

New Music Gear Monday: Audiofile Spectre Metering Package

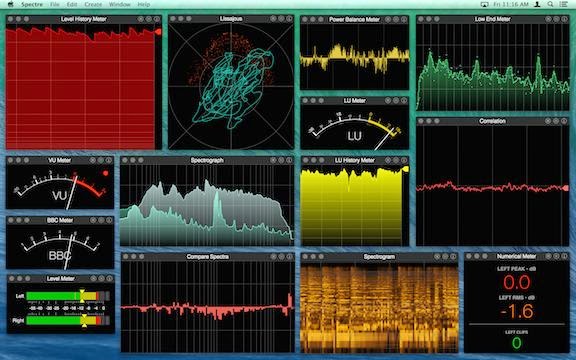
Audiofile Spectre metering package imageMetering is becoming more important than ever in just about every recording and mixing environment, but not every DAW has the metering necessary for every application. Now that deficiency can be easily and inexpensively rectified with Audiofile's latest Spectre metering package.

Spectre is filled with 20 different multichannel meters, including level, VU, spectragraph, spectrogram, oscilloscope, various phase meters, LU and more. You can have any or all meters open at once.

Spectre is a stand-alone package that sits on your desktop and can accept audio from a variety of sources, including your computer audio interface, so you always have a good idea of what's happening where it counts. The app is designed for OSX Mavericks and is Retina-ready.

Best of all, it's available right now for 50% off its retail price, so you can get it for an incredible $49.99. There's also a fully functional demo version available as well. It's a great deal and great bang for the buck. Check it out on the Audiofile website.
----------------------------------

Friday, June 13, 2014

Bassist Dusty Wakeman On Today's Inner Circle Podcast

bassist Dusty Wakeman image
Today's Inner Circle Podcast features bassist Dusty Wakeman, who also happens to be president of Mojave Audio.

Dusty will discuss the state of country music, playing in the studio, record production, his 3 string bass, and even a little about the great microphone line that he represents so well.


Check out the podcasts at bobbyoinnercircle.com or on iTunes.

----------------------------------

Thursday, June 12, 2014

Marvin Gaye "Ain't That Peculiar" Isolated Bass and Drums

We all love those old Motown tracks recorded in Detroit in the 60s, and one of the driving forces behind them was the innovative bass playing of James Jamerson. He's been massively influential to bass players since, and rightfully so; the man was truly original. Here's the isolated bass and drum tracks to the great Marvin Gaye's hit "Ain't That Peculiar," which reached #8 on the Billboard Hot 100 chart in 1965. Here's what to listen for.

1. The bass sound is straight out of the 60s, with all of the high-end was automatically rolled off. The thinking back then was, "It's a bass instrument. It doesn't need any high-end."

2. Likewise, the bass is out in front of the drums, while the drum sound is very undefined. Again, this was the sound of the 60s when there were only a couple of mics on the drums and the bass anchored the mix.

3. The leakage is really interesting. If you listen on headphones, you'll hear the piano and horns in the background, proving that they actually did track with the entire band.

4. This is one of the more controlled bass parts played by Jamerson, who follows the bass pattern pretty faithfully throughout the song. In other songs of the period, his playing was much more free-form.

If you like these isolated tracks, you might also like my Deconstructed Hits book series that takes an X-ray look inside different hit songs from different genres and eras.


----------------------------------

Wednesday, June 11, 2014

The Vocal Range of the World's Greatest Singers

Concerthotels.com developed this great chart on the vocal ranges of some of the world's most well-known vocalists. It's an interactive chart, so when you hover over a singer, it will tell you the highest and lowest note and attribute it to a song. You can also find who has the highest and lowest range as well by selecting the sort button at the top.

I think it's interesting that Axel Rose holds the record (according to the chart, anyway) for both the highest and lowest note for males, while less surprisingly, Mariah Carey holds it for females.


The Vocal Ranges of the Greatest Singers. From Mariah Carey's ear-piercing whistle to Barry White's deep bassy growl, compare the vocal ranges of today's top artists with the greatest of all time. (via ConcertHotels.com).
----------------------------------

Tuesday, June 10, 2014

A Foolproof Method For Miking A Guitar Amp

Sometimes getting an electric guitar center is dead easy and other times getting the sound to fit into the track seems like the most difficult thing in the world. Here's an excerpt from my Audio Recording Boot Camp book that provides an almost foolproof method for miking a guitar amplifier.

"Electric guitar recording has evolved through the years, from miking the amplifier from a distance, to close miking, to using multiple mics, to recording direct and finally using an amplifier emulator. No one technique is better than another. In fact, multiple techniques are frequently used on the same recording.

Electric guitars don’t have need anything fancy to capture them. The frequency response doesn’t go that high or that low, and the more distorted it is, the fewer transients the signal has, making it somewhat easier to capture than other instruments. Has a result, dynamic mics are frequently used with good results. That said, sometimes it’s surprising just how good an amp can sound when a large diaphragm condenser or ribbon mic is used, so don’t be afraid to experiment.

Miking The Speaker Cabinet
While many engineers like to use our friend the Shure SM57 in this role, just about any mic can work if you know the sound that you’re looking for and the best way to approach it.

Classic Setup One - Close Miking The Cabinet
Standard speaking cabinet miking technique image
Figure 1: The standard cabinet miking technique
A) If there are more than one speaker in the cabinet, listen to them all to find the one that sounds the best. Is one scratchy sounded or distorted? Is one muffled with no high end? Does one have no low end? Find the one with the best balance of frequencies that’s not intentionally distorted.
B) Place the mic about one inch away from the best sounding speaker in the cabinet and about three quarters of the way between the edge of the speaker and the voice coil (away from the voice coil). Have the guitar player play the song you’re about to record and listen on the monitors. Does it sound like what you heard in the room? Is the sound full enough? Is it too edgy? Is it too bassy? 
C) Move the mic towards the voice coil (the center of the speaker - see Figure 1)). Is the sound still full? Did it brighter? Did it get bassy?
D) Move the mic towards the outside edge of the speaker. Is the sound still full? Did it brighter? Did it get bassy?

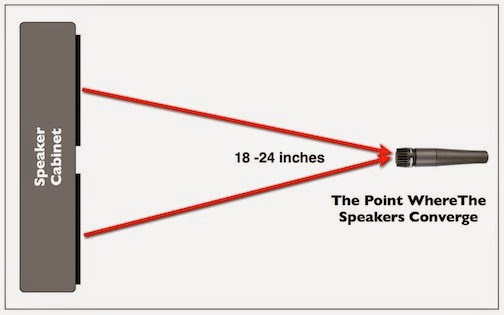
Classic Setup Two - Distance Miking Where The Speakers Converge
Distant guitar cabinet miking image
Figure 2: Distant miking
E) Move the mic about at least a foot away from the the speaker or speakers to capture some of the room sound. The ideal distance on a cabinet with two speakers is where the output of both speakers combine (see Figure 2). Does it sound bigger? Can you hear the sound of the room in the recording? Can you hear some frequencies cancel out between the two speakers?
F) Move the mic to the side to capture more of the sound of one of the speaker’s voice coils if more high end is required.

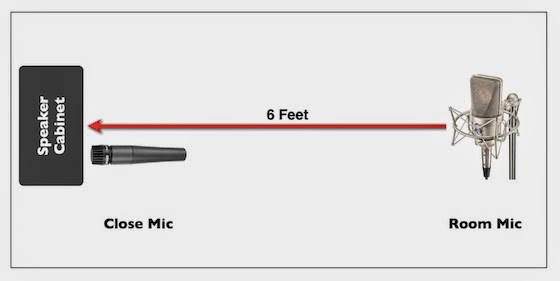
Classic Setup Three - Close and Distance Miking
Close and distant guitar cabinet miking image
Figure 3: Close and distance miking
G) Move the mic back to the best sounding position close to the speaker and add an additional mic at the spot where the sound of the speakers converge 18 to 24 inches away. Is the sound still full? Did it get brighter? Did it get bassy? Did it get bigger sounding? Is it closer to what you heard in the room? Is there more of the room sound?
H) Increase the distance to 6 feet if possible (Figure 3). Is the sound still full? Did it brighter? Did it get bassy? Is there more of the room sound?
I) Place both mics at the point where they give the sound closest to what you heard in the room, or what best fits the track when the other instruments are playing."

By following this guideline, you should end up with a guitar sound that fits your track well without having to resort to any EQ or effects.

To read additional excerpts from the Audio Recording Basic Training book, go to the excerpts section of bobbyowsinski.com.
----------------------------------

Monday, June 9, 2014

Goodbye 3.5mm Jack

headphones with lightning connector
Don't you just hate those 3.5mm mini-phone jacks and plugs? The jacks are really fragile, and now that most headphones come that way, you always have to have a 1/4" adapter handy when connecting to professional gear.

I'm happy to report that the 3.55mm jack may be headed for obsolescence, as Apple has quietly announced that it will soon be providing headphones with a Lightning connector on its upcoming gear. That means that the A/D and D/A convertors can be moved to the headphones so they will be capable of receiving 48kHz stereo audio and send 48k from the microphone. It will also allow more remote control features from the headphones as well.

Apple will supply two headphone configurations: a simple one where the convertors live on the playback device, and a premium version with the convertors onboard. Since the premium headphones can draw power from the playback device, they can also incorporate noise canceling features as well.

There's some speculation that the first units will come from Beats, now that Apple owns them. That said, I wonder what one does when you need a headphone extension cable? And will it be a hassle when we won't be able to use our current phones with our iDevice?
----------------------------------

Sunday, June 8, 2014

New Music Gear Monday: Eventide DDL-500 Delay Module

Eventide DDL-500 module image
We all love 500 series racks and modules. They're portable, and the mix and match factor can't be beat. Most modules have fallen into the mic pre, EQ or compressor categories, however, until now. Eventide has introduced its DDL-500 module, which finally puts a delay into a 500 rack space.

Eventide has a long history with digital delay, being one of the first companies to manufacture a rack mount unit (the model 1745) way back in 1970. The DDL-500 takes the best from that heritage and the best from modern technology to offer a module that's as analog as possible, with digital circuitry kept to a minimum.

The unit features 10 seconds of delay at 192kHz sample rate, which can be increased to 160 seconds at a lowered 16kHz rate. It also features soft saturation clipping, low pass filter, feedback control, insert loop, a relay bypass and up to a +20 boost.

Let's face it, delay plugins are great, but sometimes you just need that hardware sound to make a difference in your mix, and that's where the DDL-500 comes in. The Eventide DDL-500 retails for $899. See the specs and additional features on the Eventide site.
----------------------------------

Friday, June 6, 2014

Rich Tozzoli On Today's Inner Circle Podcast

Television composer Rich Tozzoli image
The next Inner Circle Podcast has been posted and this one's guest is television composer and author Rich Tozzoli. Rich and I will discuss the ins and outs of writing and recording music for television as well as some of the gear that he uses.

Rich was also my co-author on The Ultimate Guitar Tone Handbook and you probably know him for his columns in Pro Sound News and Premier Guitar.

To catch the podcast, click on BobbyOInnerCircle.com or go directly to iTunes.

Also, if you dig the podcast, be sure to leave a short comment on iTunes. It's very helpful.

And please, let me know what you like or don't like about the show as well.
----------------------------------

Thursday, June 5, 2014

The Police "Message In A Bottle" Isolated Bass

The Police was one of the biggest bands in the world in the 80s thanks to great hooks, vocals and musicianship. Some of this is on display on this isolated bass track from the band's big hit "Message In A Bottle," from the band's second album Regatta de Blanc. It's easy to think of Sting as a singer and songwriter, but he's an excellent bass player as well, as you'll hear.  Here are some things to listen for.

1. The song was cut live with the entire band playing, as you can clearly hear both the guitar and drum leakage.

2. The bass part is very solid, but there are a few very minor timing mistakes (especially in the chorus) that we'd probably fix today.

3. There's an overdub at the end of interlude after the first chorus before the second verse begins at 1:06. You can hear the leakage go away and the sound of the bass change.

4. It sounds like the outro is from another take as the audio drops out, then changes slightly at 3:23.

5. Sting changes the bass part slightly on the outro, turning the bass riff around.

If you like looking at the x-rays of songs like this, check out my Deconstructed Hits book series.


----------------------------------

Wednesday, June 4, 2014

Creating Rhythms Through Convolution Processing

One of the coolest things about most large budget movies is that all of the sound design is created specifically for only that movie and traditional sound libraries are rarely used. Wouldn't it be cool to take the same approach to the sounds we use in music as well?

Here's a great video by my buddy Diego Stocco who shows how to turn ordinary sounds into something more musically usable by using convolution. A convolution engine works by taking a series of impulse responses (samples) to create a new but related representation of the sample. This is the process behind the various "modeling" devices that digitally mimic microphones, signal processors and amplifiers. Diego specializes in this process when it comes to sound effects, and may be its greatest practitioner, so you're seeing the best at work.

You can watch additional videos and read more about what he does in this article, or on his website at diegostocco.com.

----------------------------------

Tuesday, June 3, 2014

How To Avoid Electronic Phase Cancellation On A Drum Kit

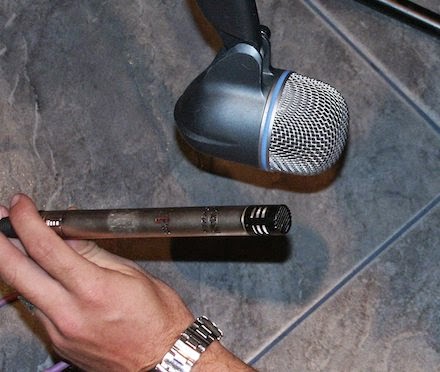
Checking Microphone Polarity image
Things happen in the course of a recording session. Knobs get turned, switches get flipped, plugins are bypassed and then forgotten about later, which can result in something sounding not quite right.

A big problem when recording drums is phase cancellation because there are so many mics normally used. Here's an excerpt from the 3rd edition of The Recording Engineer's Handbook that will show you a foolproof way of avoiding electronic phase cancellation on your kit.

"One of the things that you’ll see frequently throughout this book are references to a phenomena known as “phase cancellation.” One of the most overlooked aspects of recording is how microphones interact with each other, both acoustically and electrically. 
The reason why this is a concern is that it only takes a single out-of-phase mic to destroy the sound of a multi-miked instrument like a drum kit, and if not corrected, the sound may never be able to be fixed.

There are two types of phase cancellation; electronic and acoustic. Most of the phase problems we’ll discuss in the book are acoustic in nature, but  there’s also an instance of electronic phase cancellation that you should know about as well. Keep in mind that this has nothing to do with mic placement as it’s strictly an electronic problem that never shows up until multiple mics are used.

Electronic phase problems are almost always caused by a cable in the studio (usually a mic cable) that’s been mis-wired during an install, repaired incorrectly, or originally wired incorrectly from the factory (which is rare). The polarity check is used mainly to be sure that all mics are pushing and pulling the same way and to check for mis-wired cables, which happen more than you’d think even in some of the best facilities in the world. 

Checking The Polarity
Checking microphone polarity should be one of the first things that an engineer does after all the mics are wired up and tested, especially if you’re working in an unfamiliar studio. This is especially true before a tracking session where a lot of mics will be used, since having just one mic out of phase can cause an uncorrectable sonic problem that will most likely haunt that recording forever. A session that is in-phase will sound bigger and punchier while just one out-of-phase mic can make the entire mix sound tiny and weak.

For this test we’ll be using the phase switch on the mic preamp, DAW interface or console, since it’s really a polarity switch that changes the phase by 180 degrees at all frequencies by swapping pins 2 and 3 of a balanced microphone line. Here’s the test:

1. After the mics are set up, wired and checked, but not necessarily placed, pick one mic that can be easily moved. This can be a scratch vocal mic, a hat mic, or a guitar mic; it doesn’t matter as long as it works, sounds good to begin with (meaning that it’s not defective) and can move next to the farthest mic used in the session. This mic will become our “gold standard.”

2. With the gold standard mic in hand, move it next to the kick drum mic (or any other mic that you wish to test for that matter). Place both mics together so the capsules touch and speak into them from about a foot away (the distance isn’t critical - see the figure on the left).

3. Bring up the faders on both mics so the audio level (not the fader position) is equal on both. You can check this by making sure that the level meters read the same.

4. Flip the phase of the mic under test (in this case, the kick mic) and choose the position that gives you the most low end.

5. Repeat with all the other mics used on the session.

Remember, you’re not flipping the phase of the gold standard mic; only the one that you’re testing."

To read additional excerpts from The Recording Engineer's Handbook 3rd edition and my other books, go to the excerpts section of bobbyowsinski.com.
----------------------------------

LinkWithin

Related Posts Plugin for WordPress, Blogger...